The Little Mermaid, A different take

I recently saw some online images of the Finnish ballet of Hans Christian Andersen's, "The Little Mermaid" and was totally floored. Everything from the costume design to the lighting and dance have a slightly dark and mysterious tone that feel just right for the classic tale, departing completely from the Disney version. It made me wonder what other cultures and takes on the tale might be interesting to see. I was inspired by the architecture of Okinawa and thought perhaps the Little Mermaid might fall in love with a Samurai. I'm not sure I really got it but it was seriously a blast to dream about.

Some initial thumbnails, dreaming about what kind of island The Little Mermaid first encounters the Samurai.

This is an establishing shot of the island I chose from the thumbnails, just before The Little Mermaid meets the Samurai she falls in love with.

I was thinking of some foreshadowing in the architectural motifs. These are a few ideas. The possibilities are endless, really. Below are a few variations on The Little Mermaid. I still feel like I want to do a few more pages of these and then move on to the Samurai, Triton and the Sea Witch.

Many more updates coming in a few weeks! Thanks for visiting.

Bee Rider

"Bee Rider", photoshop

A few years ago I had this idea that tiny humans with wings were discovered in various regions of the planet. It's not a new idea at all, but I wanted to mess around with making these fairies a sort of tribal, pagan warrior race that looked more human than the wide-eyed alien version. I am deeply inspired by the art of Mary Cicely Barker (of Flower Fairy fame) and Margaret Tarrant , Edwardian era artists that depicted tiny human-like fairies usually of a friendly beautiful sort. 

Margaret Tarrant watercolor

Cicely Mary Barker watercolor

I wanted to take their ideas about fairies and focus on aspects of character personality and group culture. It's a pretty big project that I am picking away at here and there in between many other projects. 

I did this quick little sketch about five years ago. I like the idea but it's a little too vertical for the kinetics of the scene, and the costume doesn't work for me. I wanted to explore warriors that are more gutsy and brutal instead of sweet. I scanned my sketch and then did a TON of loose drawings on top to work out the idea more to my liking. 

I also did a few studies of bees. Here are a few sketches. I thought about stylizing the shapes and the character far more than this, but in the end decided I'd rather focus on the story of the character, and of course (since I love to paint) the light.

I have a several more warrior fairies in the works in various states of finish. Hopefully I'll post a few more this year in between other posts. :)  Thanks for reading!

2016

Being a Capricorn, I have always been driven to succeed. It is frustrating to me that even with all my heart and intentions, I have yet to complete some of the many goals I set out to complete way back in my 20's. There are, of course, many complicated life reasons for this. 

This year I've decided that no matter what, I will accomplish a few of my big art goals, no matter what. 

Seven times fall, eight times stand up. 

I did an alternate, darker version of this painting as well. I can't decide which I like better. 

Happy New Year 2016!

Star Wars Comps for Concept

Earlier this year for a class assignment with Armand Baltazar at the Animation Collaborative, we had an assignment to come up with a scene or concept that currently does not exist in a movie. One of my all time favorite movies is, of course, Star Wars, the original trilogy, but most especially "The Empire Strikes Back", where we meet Darth Sidious, "The Emperor", for the first time. 

Up until that point, we feel that Darth Vader is the most powerful guy in the universe, even though we are conscious that he is definitely working for someone. When we meet The Emperor, he seems to be parallel to Master Yoda in power but belongs to the Sith and rules the Empire. However, I had always thought that since Darth Vader has unusual power, the Emperor, being a completely corrupt man, would perhaps have some other way of gaining force power than just by being himself. In addition to that, he must have been extremely peeved when Vader let Luke get away. 

I imagined that in between "The Empire Strikes Back" and "Return of the Jedi", Darth Sidious brings Vader into his private chambers where he keeps a gigantic symbiotic parasite that he uses to not only control Vader, but also torture him and secretly extract force energy from him.

Here are a few concepts. I will bring one of these to full color soon, hopefully in the new year!


Additionally, I sculpted a bust and draped some cloth over him to create a nice working model of the Emperor's face. I've wanted to do a portrait painting of the man, and this will be very helpful for lighting. 


"LOSING TIME", Poster Roughs

This year I have been very busy writing and rewriting, and then rewriting again the story for a graphic novel tentatively titled, "LOSING TIME". 

The story takes place in the same universe as HG Wells' 1895 classic, "The Time Machine", but is an expansion of that world and events. 

Since I am also currently enrolled in Pixar Production Designer Steve Pilcher's Production Design course at the Animation Collaborative, I thought I would focus my class efforts on moving forward with this project to see where it would lead with some really great feedback.

Immediately, Steve assigned "mood boards", story beats and other art that visualizes a general tone of the story, but only in three values. The idea here is to get a strong composition and mood that identifies the feeling of the story. I decided to focus on act 2 of my story, and although these are likely to change dramatically as the script develops, these were an awesome exercise that I will likely take with me on virtually every project I design on.


After the mood boards, we moved on to poster roughs. Creating a poster or cover art go a long way towards representing the overall motifs of the story. Working on this exercise has really helped me to think more deeply about the motivations and core ideas of the story I am developing in a way that I might not have otherwise thought of. 

Here are are my initial roughs. 


I will likely pick one of these from the second page, perhaps incorporating a border as well. I'll post the final after I finish it in a few weeks,  probably a week or two after CTN in Burbank this week! :)

Stay tuned, and thanks for reading!

CTN Ad

This year I took up the opportunity to advertise in the CTN Sketchbook, a collectible printed sketchbook you can buy. I created this ad using some of my art. The book is in black and white, and because of that I submitted this piece in black in white. The 2015 sketchbook should be available in a few weeks at the

CTN STORE

I liked the composition a lot, so I also created it in color, too. I also made a bookmark of "The Act". I will have both color bookmarks while at the show. If you see me ask for one - they're free! Ping me at @Paintkatt on Twitter if you're at the show and want a bookmark!


Thanks for reading!

A Couple of Plein Air Digital Paintings

For awhile now, I've been trying to come up with an easier take-with-me-everywhere method of plein air sketching. I have full plein air kits for pastels, oil and watercolor, but often I find that even though I keep one of these kits in the trunk of my car, I usually don't feel inclined to bring it all in to a restaurant, coffee shop or on an afternoon trip downtown. I wanted something MUCH more lightweight and accessible - and the iPad has been it.

Here is a sketch from a recent day trip to the ferry building in San Francisco, a busy tourist-heavy area of the city. 

A lovely day plein air painting at the San Francisco Ferry Building. I used the iPad Air, Procreate app, and Wacom Stylus 1. Music by Karrin Allyson, "From Paris to Rio". A note about the stylus: I recently purchase the Wacom Stylus 2 and discovered it does not work with many apps, including Procreate.

My main objective with iPad sketching is to mimic plein air oil paint using the alla prima technique, direct painting, as opposed to more labor intense methods. The idea is to work quickly on site and get it all down in about an hour or so of working. That means everything from gesture, composition, hue, value relationships and light relationships.

About the hardware: I have yet to find a stylus I am completely comfortable with; I am currently using the Wacom Creative Stylus. I am not keen on recommending it, however, because it feels like painting with a giant crayon. I unfortunately purchased the Wacom Creative Stylus 2 and found afterwards that it is not compatible with many painting apps, including Procreate. A few friends have given good reviews of the Jot Adonit Stylus, which is far cheaper and compatible with a lot of apps. 

In the Procreate app, I created a set of swatches in the color picker that are the standard colors of my basic oil painting palette, plus a few white convenience colors so that I don't have to constantly mix the same color over and over. Using these swatches helped me in getting a similar look to traditional paintings, although I think I could still fine tune the set. 

In addition to that, I am still trying to refine my brushes to find a working method that mimics traditional brushes. Procreate provides a set of brushes that you can then customize, but  I have yet to find some that are to my liking.

Continuing my exploration of digital iPad paintings with the Procreate app, I've tried to mimic my oil painting palette in the color picker to see if I can narrow down my palette choices. I am trying to find a good working flow for alla prima digital studies that actually look like oil painting sketches.

CTN Expo in Burbank and new website updates!

Hey friends! I will be attending the CTNX animation expo in Burbank, California this upcoming weekend in order to show my portfolio, get some much needed feedback, meet up with friends, go to lectures and geek out over all the awesome art! Here are a few highlights from my portfolio. Although I am in the midst of working on a couple of story projects, I put together this basic portfolio with highlights from those projects (still so much more to come) and a couple of images from my game experience. I'm going to the expo with the intent of getting some feedback on the personal work so that I can focus for the next few months on what I need to accomplish.

THE TIME MACHINE: Visual Development with Armand Baltazar/Animation Collaborative

I recently took a visual development course at the Animation Collaborative taught by senior visual development artist Armand Baltazar, who has worked for many years in animated film, with credits on Dreamworks, "Shark Tale", "Spirit", and "A Bee Movie", as well as Disney's "Princess and the Frog", and more recently Pixar's "Cars 2", among many others. Of all the classes I've taken in recent years, I found this course to be perhaps the most exciting. I've always been deeply interested in visual storytelling, although I've not always had ideal opportunities to practice that very fine art to the fullest I've wanted. So when Armand's course came up on the roster and time in my schedule allowed, I jumped. Aside from my own interests,  I feel a good visual development class is an excellent experience for any artist at any level to go through. So many of us have grand ideas around stories, world building and stylization, but how many of us have really gone deep into our visual storytelling skills? If you've not had the opportunity to take such a class, I encourage you to find one or else pick up a few good "art of" books for film, games, and television.

 Regarding this specific class at the Animation Collaborative, I felt it was absolutely worth it. Armand was a fantastic teacher and really put in a lot of extra work and effort in teaching the class, even staying late to give back really valuable individual feedback, paint overs and advice tailored to each student. Each class was chock full of fantastic information about visual development, portfolio development, and tips and techniques for working quickly, as is required on any project in development.

For the class we each picked a classic book to visualize as an animated film. I picked HG Wells', "The Time Machine", a book that I illustrated years ago, but unfortunately didn't do a very good job of it due to the extremely rushed deadline. For years now I've wanted to revisit the story, and have imagined a reboot tailored toward an animated young adult film. I thought I'd share my character design concepts here, and later will share more development. Over the course of the next year I'll be working up ideas around this story and will share more as I solidify ideas.

***********************************************************

My Time Traveler in my reboot of "The Time Machine" is a young woman in present day. When I draw character sketches, I like to keep a very, very simple line with almost no detail. I like to save any modeling or texturing for painting. I really enjoy the challenge of trying to capture a gesture in as few lines as possible.

I envision the Time Machine device to be wearable tech made up of everyday things like hacked ipads, iphones and a laser tag vest. Like in the original book, the time machine does not move the individual through space, but only through time.

Imagine what happens to those digits after thousands and thousands of years of swiping/touch technology… I enjoyed working on my take on the ELOI quite a lot. I envisioned them growing tall and thin with elaborate hairstyles and lots of adornments. 

 The Morlocks live in underground caves where they have evolved eyes that allow them to see in the complete darkness. They live amongst the ruins, pollution and grim of thousands of years of human corruption.

Below are some quick color comps and sketches of what I have been developing around story moment ideas. Most of these are pretty quick, like 2 hours each or even less in the case of sketches. All of these are meant to be exploratory in nature, and will eventually become more finished paintings. I can't wait to work on these!

 I've long been a fan of Douglass Trumbull, well known in the film industry for his innovative special effects on movies like 2001: A Space Odyssey, Blade Runner, and Star Trek: The Motion Picture. I wanted to emulate his effects in some way, and have envisioned the bottom row of images to be my take on time travel effects.

This is my quickie version of a future city, although I have plans to iterate on this a bit more. Given that our class was only 12 weeks and I only had the weekends to work on it, I felt that I didn't have enough time to really dig through this juicy subject. Looking forward to exploring some more concepts!

Hey, who doesn't need a hot Eloi boyfriend in the future? Actually, this is one aspect of the story that I am quite excited about: the friendship between The Time Traveler and Weena, in my version female (time traveler) and male (eloi). I think this can be resonate with the story themes in some unusual ways - I'm so excited to work some more on these ideas.

I actually have a number of additional sketches and comps, but they are still a little too compy to share. Hopefully soon! 

As I continue to develop my ideas I will post. I hope to put a little book together by sometime next summer, if all goes well. 

Thanks for reading!!!

My Latest Studio Work/Progress on Final Color Pass

First session after finishing the initial color block in stage. I spent most of this session looking at the value relationships between the white of the vase (which was really a very warm-grey), the white of the board the entire set up is sitting on, the white of the flowers and the white of the butterfly. I spent a good deal of time in this session comparing between the four white areas, trying to see what the difference between them was. 

 I focused first on the flowers. In the first color block in, I felt that the shadow areas were getting a little too dark and muddy, when what I wanted was luminous colors even in the shadow areas. I painted over all of the shadow areas of the flowers and strengthened the white areas. I also pumped up the contrast on the yellow flower stamens.

**************************************************

Second session of the final color pass:

The focus of this session was on the butterfly held up by twine. The butterfly is made of white feathers, paper mache in the body, and has iridescent glitter all over the wings, making it a difficult challenge.

Sadie suggested that instead of painting each and every little dot of glitter, that I paint large swaths of blurry color - the shapes of the areas instead of pieces. I also remembered a passage in James Gurney's book, "Color and Light" about painting scales on a dinosaur. Instead of painting all of the texture everywhere, he recommended only painting the texture in the light, and especially in the highlighted area. As the textures moves into less illuminated areas of the form, it will become less and less apparent to the eye.

This was as far as I chose to push the glittery iridescent areas of the butterfly. In the next few sessions during the final pass I will revisit both the glitter areas and the string. 

**************************************************

Third session of the final color pass:

I spent almost this entire session working on the pattern on the vase and the color shifts in the shadow areas of the white areas in the vase. 

I often struggle painting white objects. As I am observing the scene in front of me, I can clearly see the light area vs. the shadow side. But when I've sat and observed these same objects over a long period, like today's five hour session, my eyes begin to pick up the subtle hue shifts, bounce colors and variation in the value. 

In the past when I'd worked in the alla prima method (direct wet on wet painting) I would just simplify these areas for the sake of turning the form, with the brush work always on stage, so to speak. The Flemish indirect method, on the other hand, provides the opportunity to get the subtle variance of the light on the form by building up layers and layers of paint. With layering, you can push and pull areas into and out of focus, glaze areas, and continue to soften or sharpen edges endlessly. All of this makes it challenging to make decisions. I've resigned to working out the "mood" of each area in relation to the whole piece.

For the final finishing details in the next 2-3 sessions, I plan to work on the gradient of the blue-green in the  background. Working over many sessions, the color in the background has begun to creep a little. Some areas are not matching previously painted areas. That happens because each session I am working on a specific area and need to mix up the surrounding background paint color so that I can soften the edges.

In the next few sessions, I will work on smoothing out the hue shift and the shadow areas so that it is a little more harmonious. I might also make the green-blue a little more saturated. The flowers still have a few textures and details that are not yet depicted, and the glitter on the butterfly is not quite there yet. Last but not least, the pattern on the vase…is it too dark? I will most likely add a light glaze of vase color on top of the pattern in the center so that it does not call itself to attention so much.

Thanks for reading!

Latest Studio Painting/1st Color Pass Finished

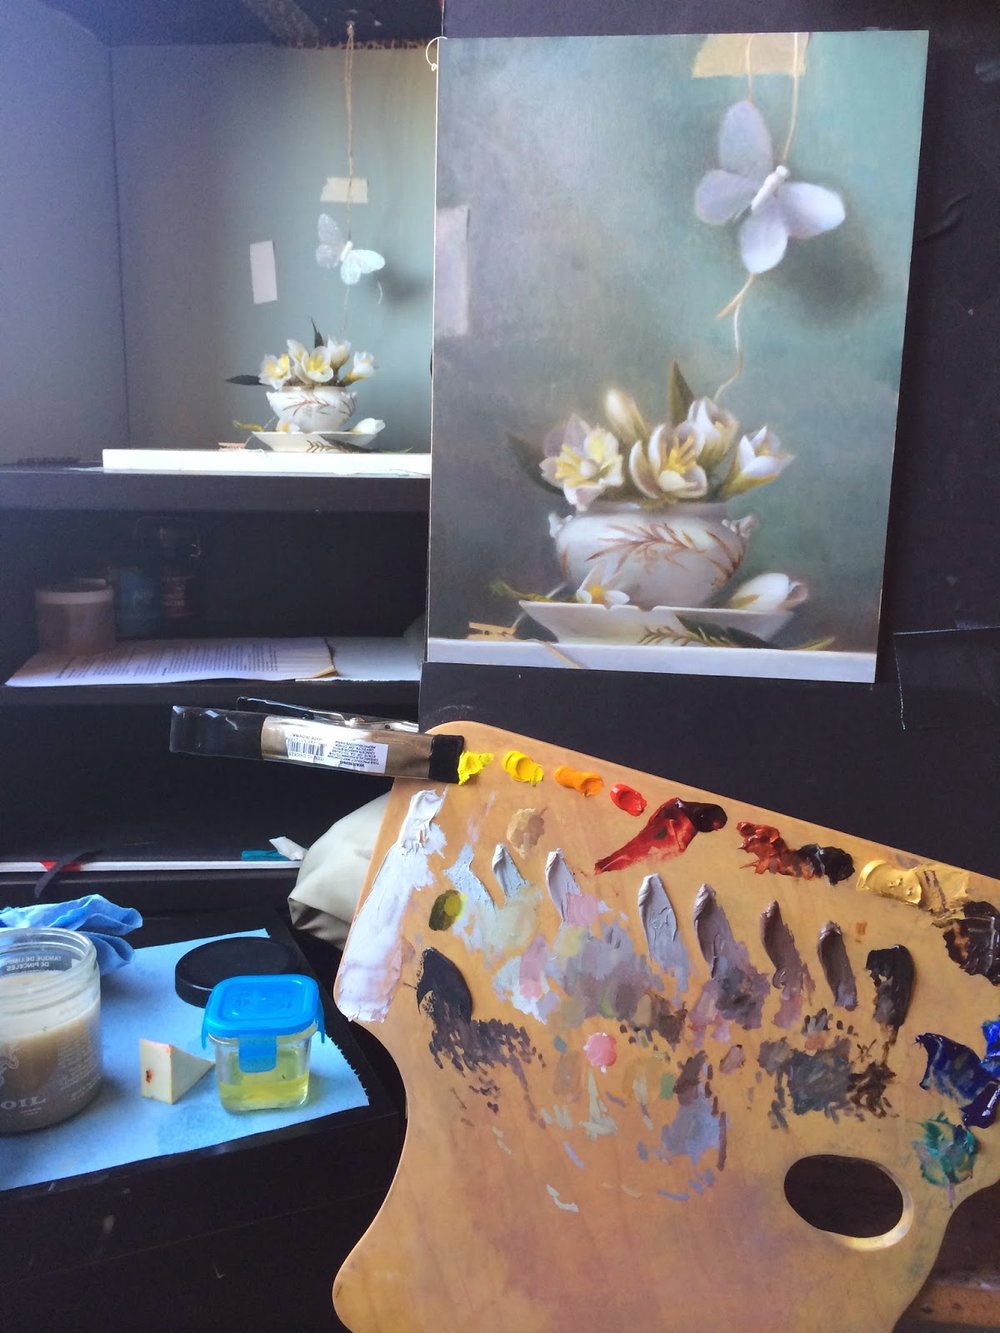
Sunday is my painting day. I paint from about 10 am until 4 pm, using that time as efficiently as I can. I put on my headphones, crank up the latest history lecture I've been absorbed in, and paint. My painting space currently is one of the still life stations at Sadie Valeri's Atelier, which has excellent light and overall great art vibes. I really enjoy watching new students learn and go through similar trials and tribulations I went through as an art student. The dedication and determination is so concentrated that it permeates the air and makes me feel motivated all week long. It is an experience I feel fortunate to be a part of. 


This past week I finally finished the first color pass on my latest still life painting. This pass is about establishing the main color relationships in general terms rather than details. At this point, I will go into the fine details and creating areas of focus.  Below is a series of process images from the closed grisaille state into the 1st pass color stage.


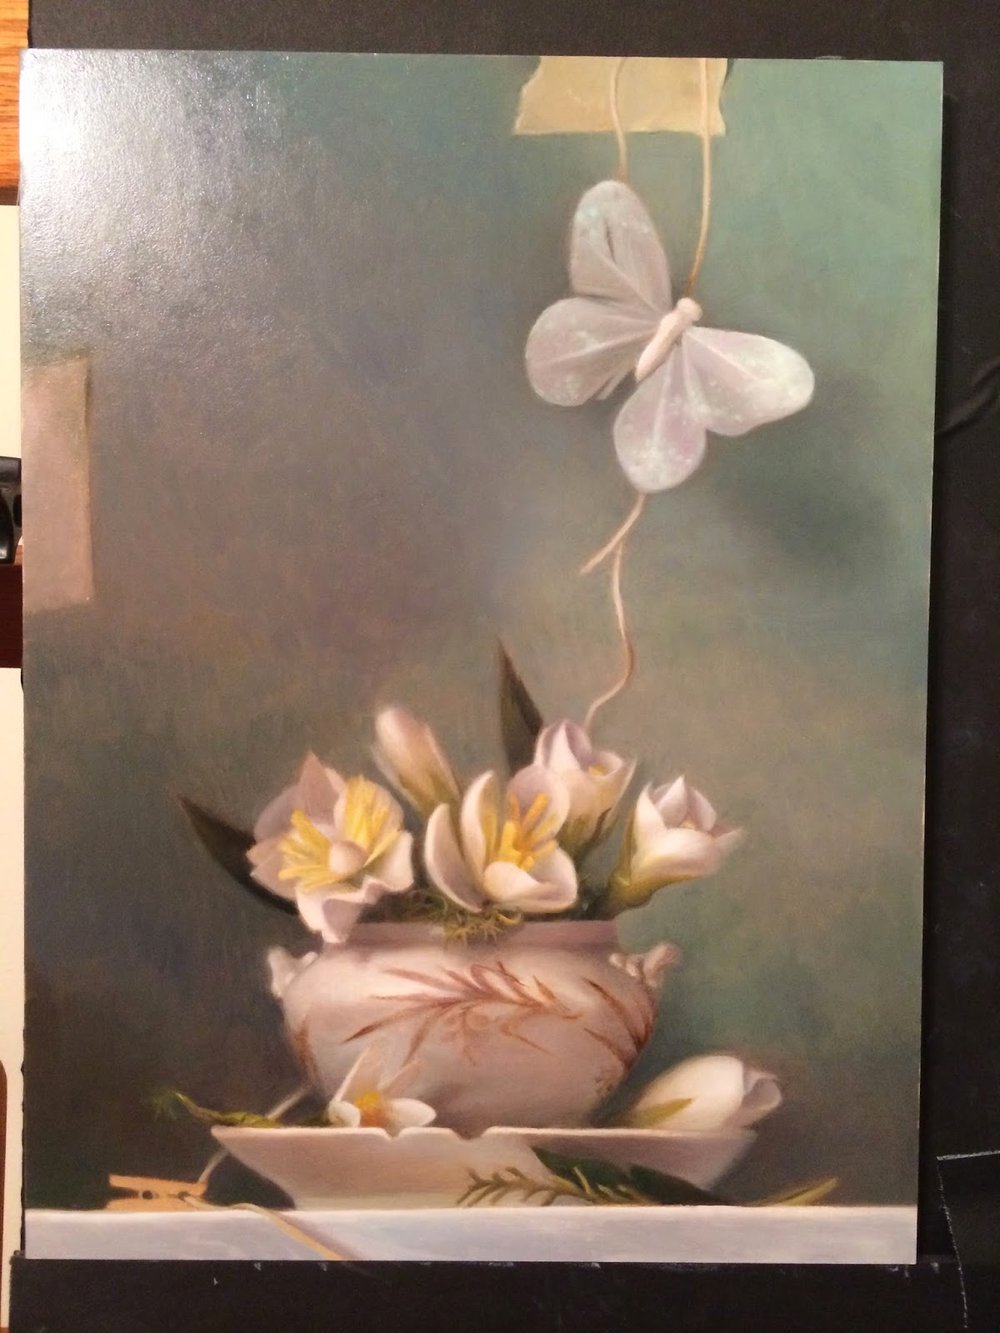
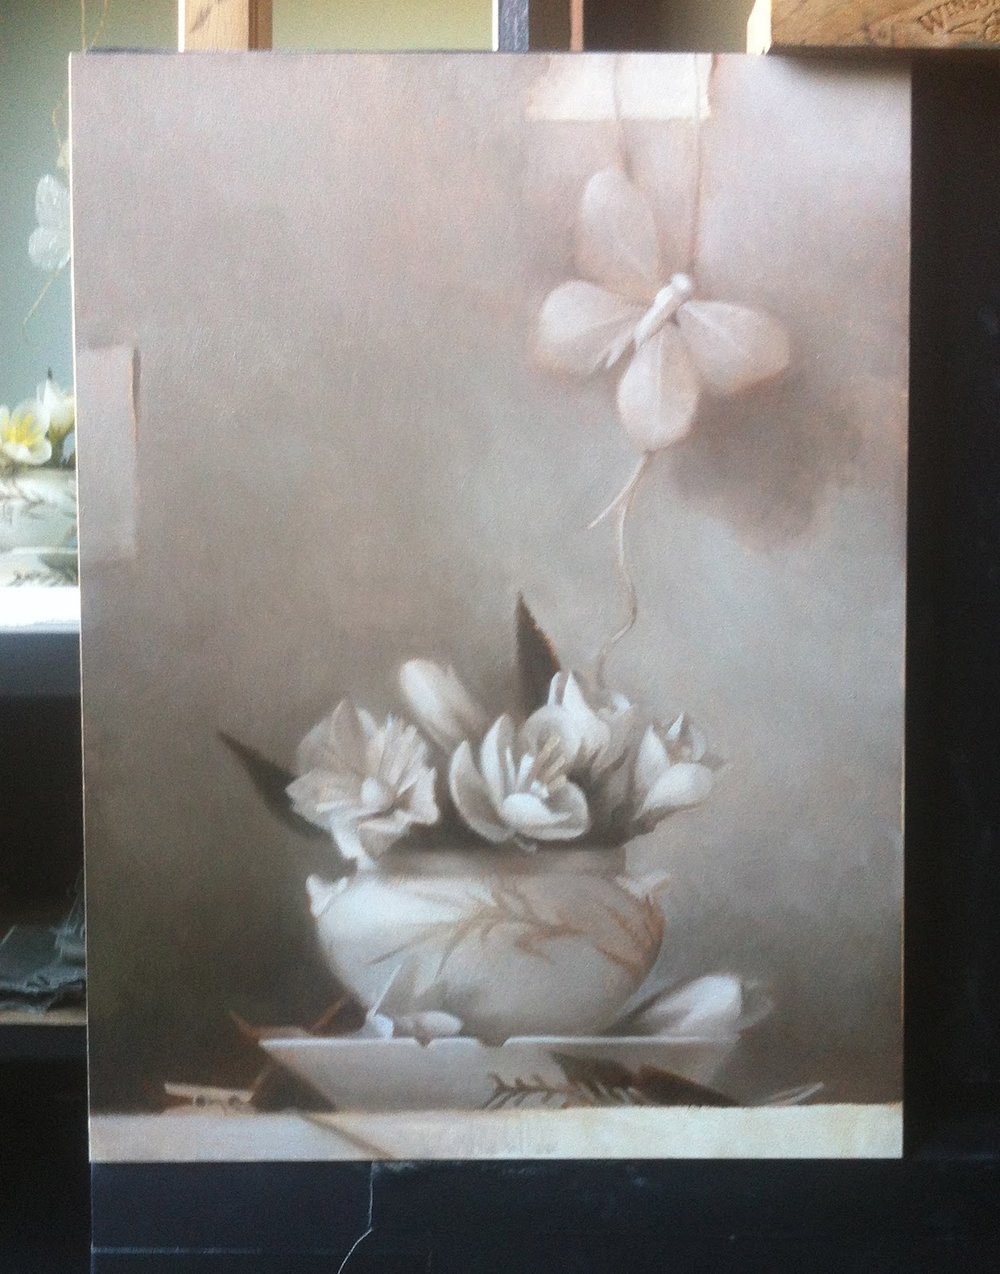
The finished closed grisaille, the 2nd underpainting that establishes a full value range. Although as an alla prima painter by training I've never separated out the value stages in this way, I've found that painting the grisaille has enhanced my understanding of how deeply value relationships are tied to color. 


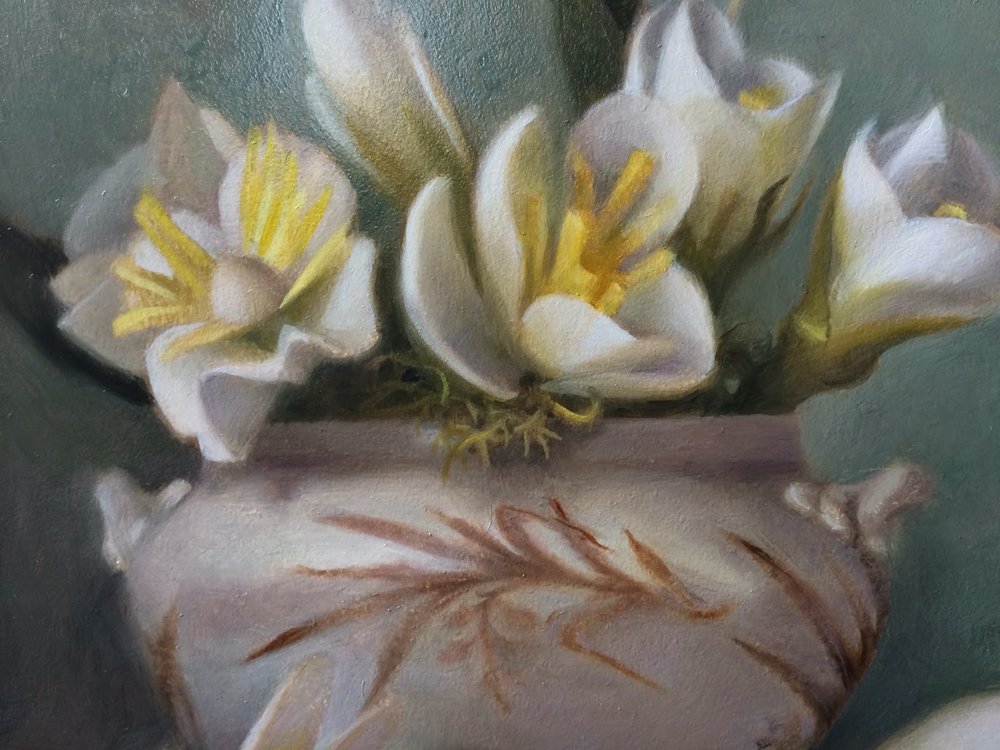
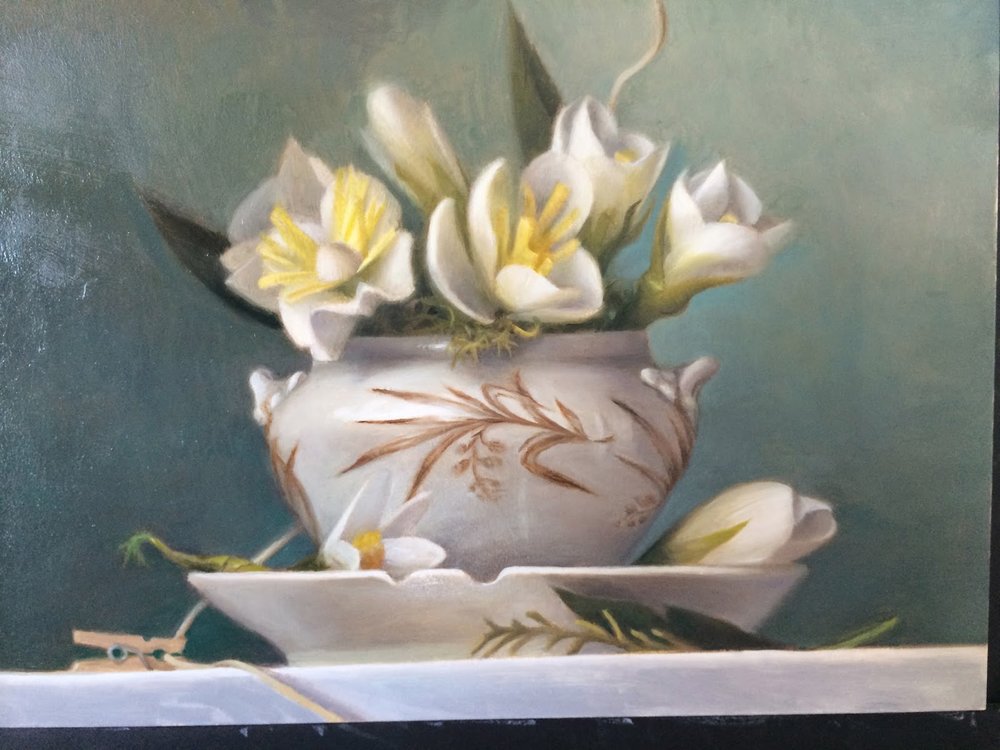
Beginnings of the color pass. There is a subtle range of color going on in the light areas of the flowers. Instead of focusing on those colors, I've painted them pure white in this first color pass. 


 In this stage I am also focusing a lot on the edges of things, making edges very blurry instead of sharp in any one area.


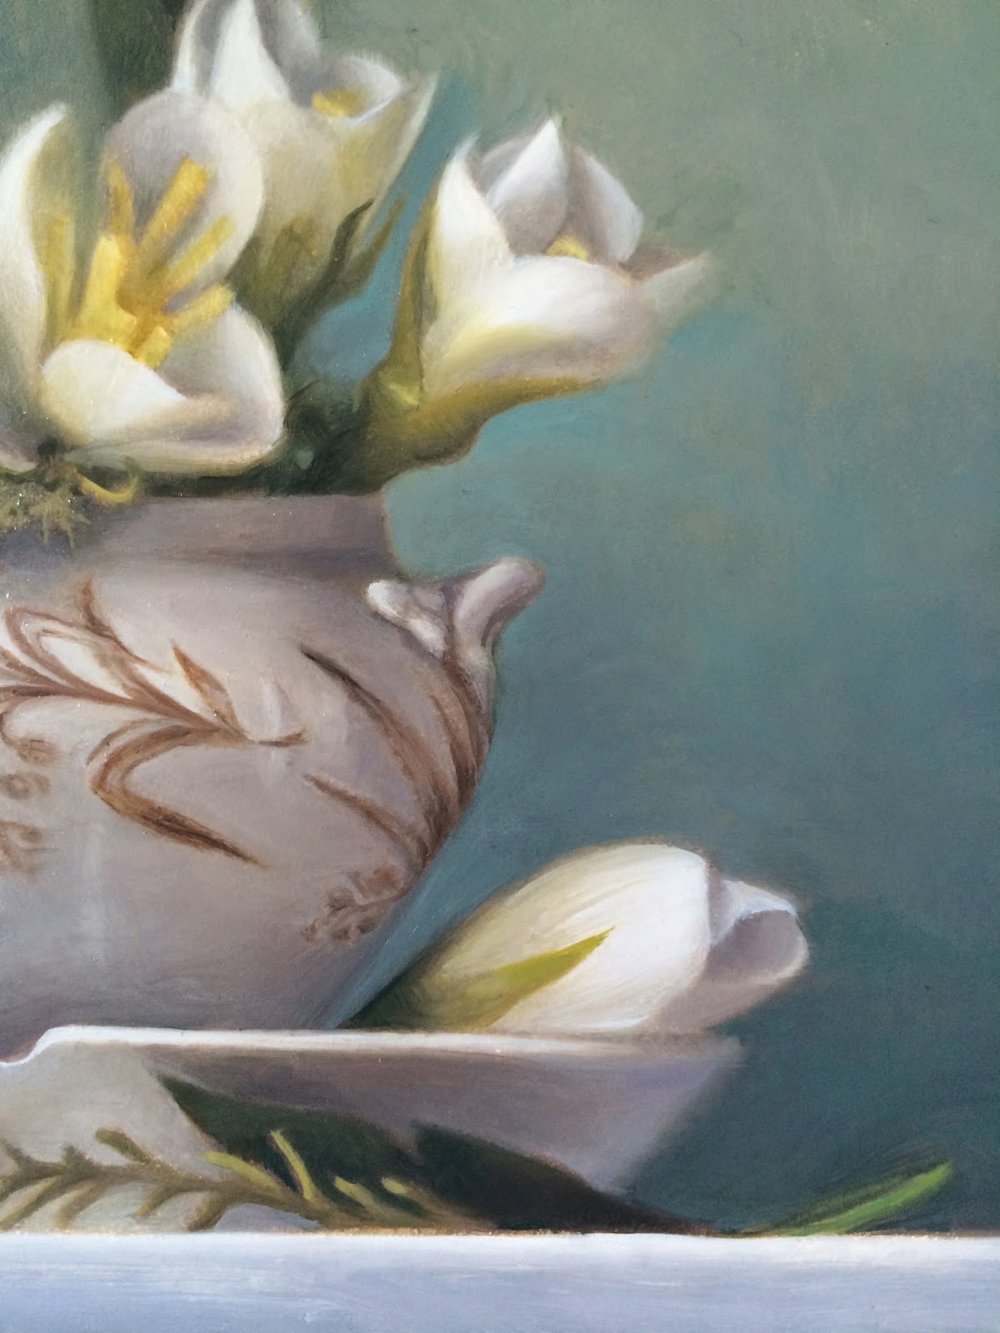
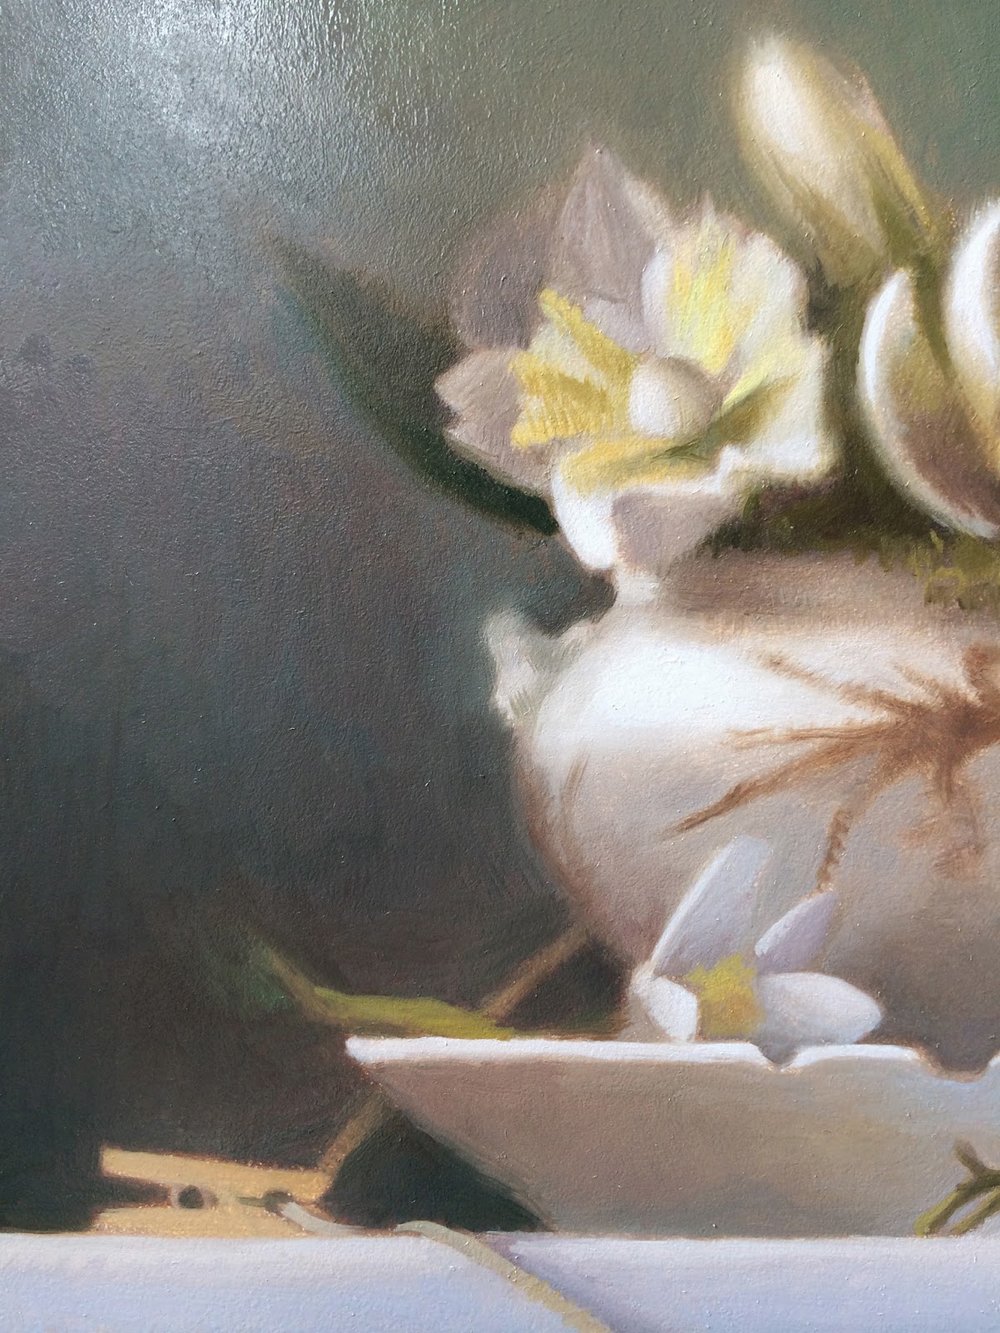
The details on the vase are painted very softly on purpose. Later when I work on the final color pass, I will sharpen up the detail where needed, including the highlight area which falls over the flower details of the vase.


Notice how blurry the edges are all around the subject. In fact, I probably should have painted them even softer. 


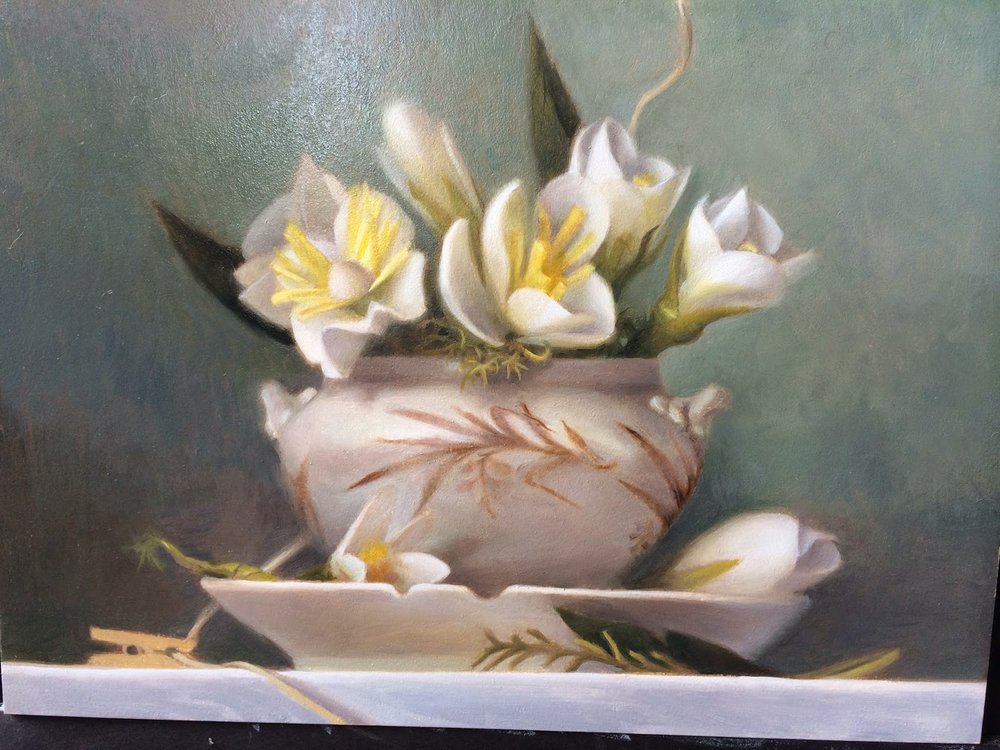
After the flowers and vase hues were painted, I began working on the hue shift in the background area from the bottom left up toward the top right. This is not necessarily a smooth transition in the actual set up, but an improvement in the light pattern that I felt worked better for the composition than what is actually happening in reality.


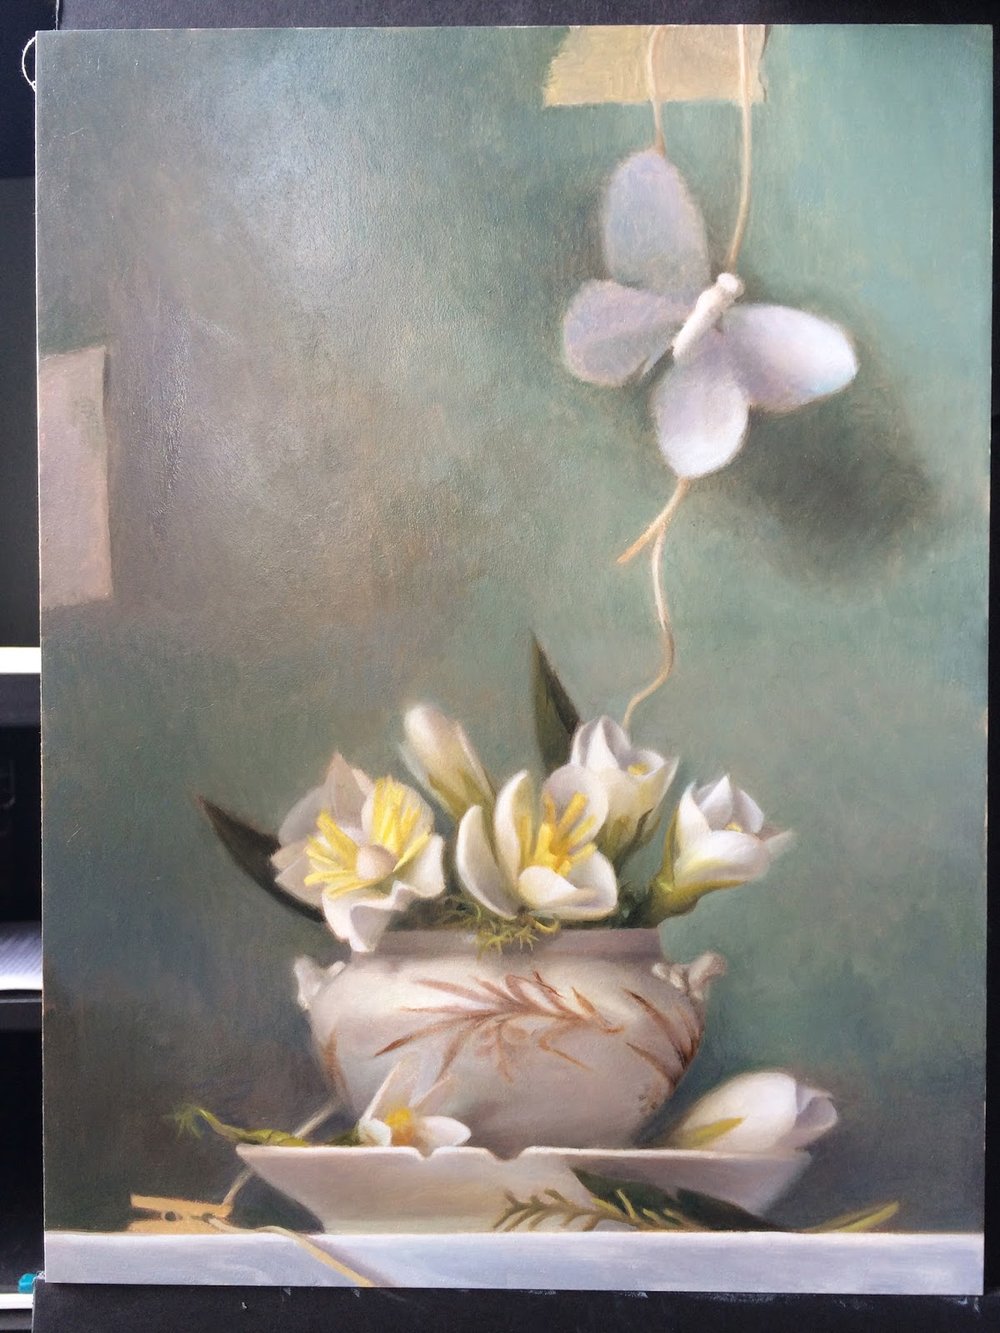
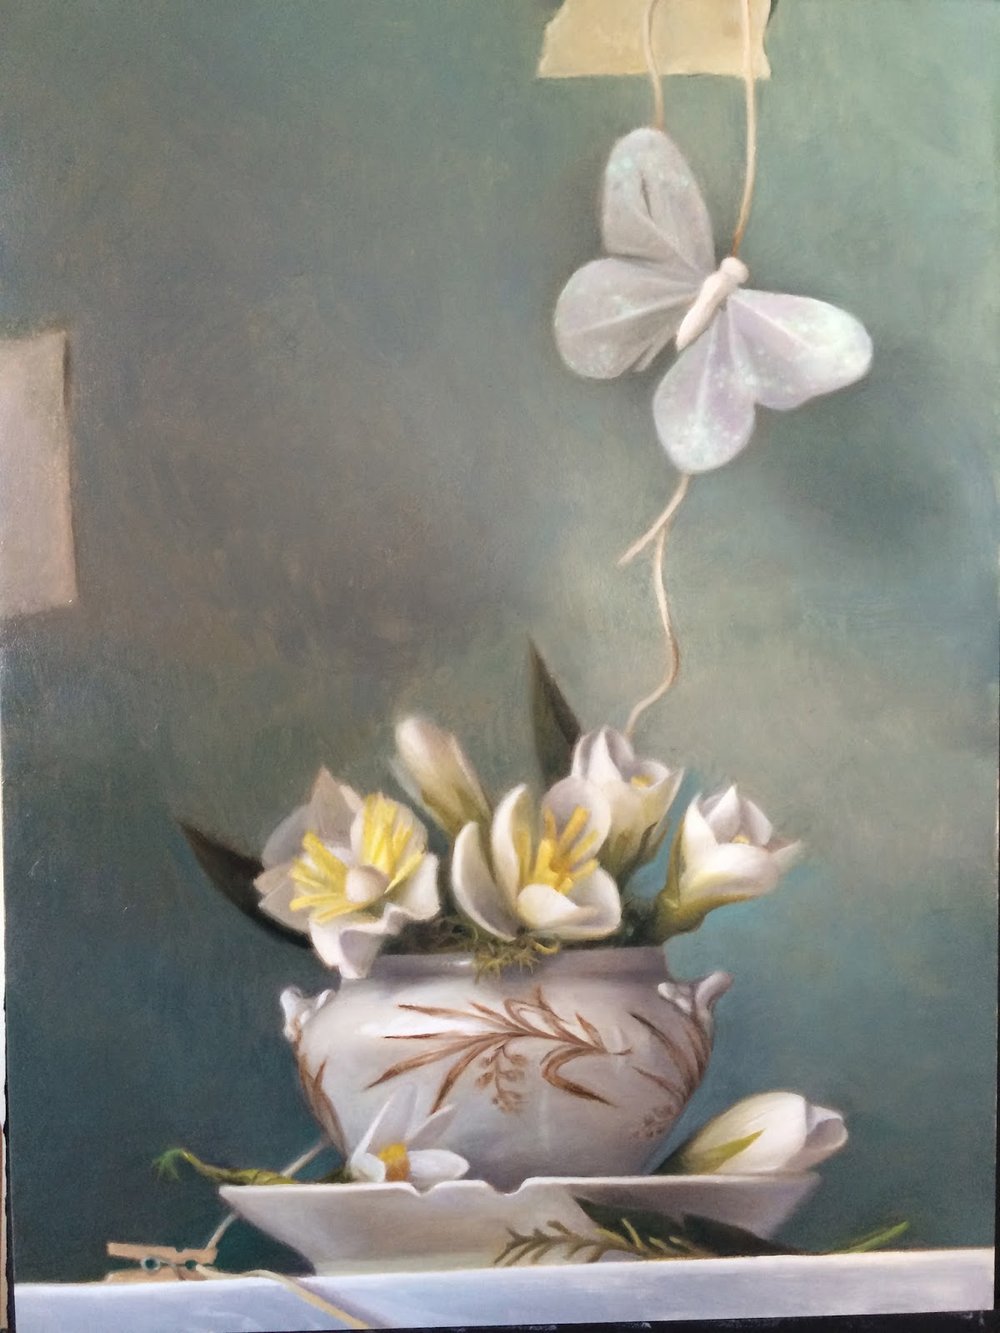
As I moved toward the butterfly and the shadow underneath it, I roughed in the color in very simple terms making sure to leave the edges extremely soft. The tricky part of this area is going to be the glittery, shimmery surface of the wings, which are feathers that have glitter applied to them. Instead of painting all of that detail, I just noted general colors and made the upper right area pure white.


The finished butterfly. I sharpened up a couple of areas in the light, but left the rest very soft.


The finished first color pass. As you can see the background gradient is still quite rough, as are patches in the vase and flowers. All of this will be addressed in the next stage as I refine the painting.

***********************************************************************

Meditations on Still Life Painting


 The subject matter in my painting is a little odd, I know. When I set it up, I had been thinking about the fantastic dioramas in the Chicago Field Museum and thought I'd try recreating that feeling of an artificially arranged environment. Instead of using real flowers in my set up, I crafted paper flowers which I dipped in wax to preserve their shapes. Likewise, the feather butterfly is not a real preserved butterfly, but is instead crafted. I chose to show the way I set up the still life by including the string, clothes pin and tape so that the viewer knows this is a set up and is not real.

As a modern viewer of any still life painting, the audience knows that the subject has been set up by the artist, every detail carefully composed, including the direction of the light. We have a relationship to narrative painting that is different than it was in the past.

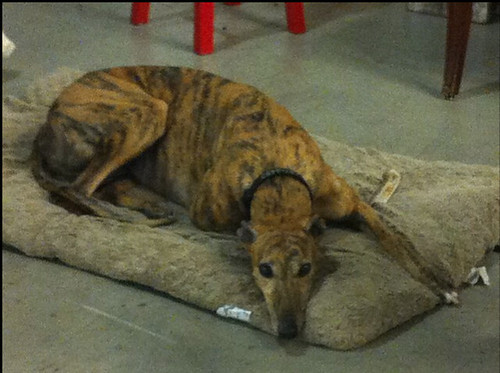
Dioramas from the Field Museum in Chicago. Taxidermy animals displayed in an artificial environment  made to look real, depicting a certain narrative of a scene that might have occurred in real life. The images in the far background are realistically painted murals. The foliage and tree branches are silk, wood and painted plaster.


Originally, still life arrangements were not seen with the same eye as we see them now. Natural History dioramas and still life paintings were similar in that they were narrative arrangements that represented a story to the viewer about something not widely known about the world, like animals on the plains of Africa or they were representative of religious beliefs or values like in many of the Flemish still life paintings of the 16th century. Viewing these depictions in our modern era, we know more about these subjects due to availability of travel, familiarity brought to us by stories told in film, the wide use of photography in remote places, and globalization via the internet. As a result, the still life in the traditional sense now holds less importance to us as an informative vehicle than it has been in the past. 


And yet, I am an artist in this modern age who has a desire to paint elaborate and narrative depictions in the still life format, creating the cart before the horse, so to speak. I wonder if in our modern era the tradition of still life painting can bring to us something of equal value or perhaps something new and different. It is a question I am thinking about a lot as I work on this painting. 

New Studio Painting In Progress

A few years back, I started taking classes at the fantastic crafting store in Berkley, Castle in the Air, where I met the most wonderful artist, Ulla Milbrath. Up until then I had mostly been working as an illustrator in games in the bay area, and was feeling quite isolated in my home office. After I was divorced in 2007, I told myself enough was enough; I decided to step out into the world again and start making connections back to the things that I truly love - not for the sake of my career or becoming anyone important in the arts, but for myself, my soul, and my own love of crafting fine things that bring me joy. 

When I was growing up my mother was always making something or other. One of my earliest memories is of my mom crocheting snowflake ornaments for our Christmas tree. If she wasn't making new ornaments for our tree, she was sewing my and my sister's wardrobes, making dolls and doll clothes for us, making all sorts of decorations and whimsical creations for the many houses we moved into as a nomadic military family. Almost every toy and piece of clothing that I wore growing up was made by my mom. 

So I started taking crafting classes and eventually stumbled into Ulla Milbrath's classes where I learned to make paper flowers. Ulla is one of the most wonderful and inspiring artists I know! She is incredibly inventive and creative, and stitches the most lovely things you can possibly imagine. She even paints on porcelain! You must check out her blog and be sure especially to follow her Pinterest account where she posts the most amazing reference material. 


Some of the flowers I made in her classes. I've since become quite obsessed with paper flower making. They are also a fantastic way to study botanical subjects.


Paper flower making was a popular past time in the 17th and 18th centuries in Europe. Botany at the time was all the rage as people became interested in plants from around the world and learned about classification of various species.  


Having lots of flowers around the house I had been wondering if it might be possible to compose them in a still life. I was thinking however that I wouldn't want them to be merely props for real flowers, but intentionally composed so that it is understood that they are crafted flowers. I played around a lot with this set up. I even included lots of other things at one point like scissors and glue, but took them out in the end because I preferred the look to be a little more subtle, kind of like a diorama.


The above monochrome is the open grisaille, the first pass underpainting. Below is the start of the closed grisaille, which ended up a terrible disaster...


I started this grisaille with a new tube of Michael Harding Titanium White no. 1. While I was painting I noticed the quality of the paint seemed thin and somewhat odd. I got as far as I could in one day. When I came back one full week later I found that 100% of all of the white areas of the painting were still very wet AND several of the half tones in the gradients were far darker and patchy than I painted them. On close inspection, I narrowed down that it was the white paint I'd purchased which was ground in safflower oil as opposed to linseed oil. When the manufacturer was contacted, he assured me there was nothing faulty in the paint and that it must be something wrong with my process… 

I decided to make the tough decision to wipe off all of the white paint that I could, feeling that it was obviously unstable paint. I did not want to risk this paint pulling up subsequent layers in the future layers.


I wiped off all the paint and found strange patchy areas underneath. 


So then I decided to sand to make sure there was no white paint left and a more even surface.


I waited a little more than a week, came back and found my painting was dry enough to repaint the grisaille again, this time using my old classic Vasari titanium white (along with burnt umber and a tiny bit of ult blue). 

The next stage will be COLOR. For this little painting I'm going to do a one day alla prima color study so that I can work out the subtle whites and reflected light in the composition. After that I will move forward with the final.


This year has been my 20th year of working as a professional artist. I am in the midst of completely redesigning my website, updating it with new art from this entire past year and a half at my job as Art Director at Disney Interactive. I have a lot of new work to share and will do so as soon as I can! I also have quite a few more tree studies to share soon.

Thanks for visiting! 

Bowie the Greyhound

 On Thursday evenings, I attend a sculpture workshop with some friends. Usually we hire a model for figurative work. This time, however, we thought we'd tackle something different,  the greyhound of one of our favorite models.

Greyhound - model Bowie

 We set Bowie up on a sleeping mat while we sculpted. Occasionally she would get up and walk around the room or go outside for a quick run. 

While I was making the armature, I observed the incredibly graceful movements of our model. I noticed the long flowing s curves repeated throughout her form and her incredibly "springy" stride. I wanted to somehow capture that kinetic grace in the pose.

Greyhound - armature

I didn't make any gesture drawings, but instead decided to just mess with the armature until I found a pose that worked. I put a base layer of clay on the armature, adjusted it several times, and after about two sessions found a pose that had movement. I had trouble with the armature because I used aluminum wire where I should have used steel; the clay is heavy and can bend the aluminum wire. To compensate I decided to make a sturdy base at the bottom and balled up aluminum foil for the rib cage.

Greyhound - first pass gesture

Greyhound - first pass other side gesture

Eventually, our Thursday night sessions ended and our model was no longer available. I decided to take the sculpture home to work on it little by little after work.

The truth is, I am not really a sculptor. I am a two dimensional artist studying the 3rd dimension, sculpture. In the 3 years since I have been learning about sculpting with my friends each Thursday, I have found that the practice aids my understanding of depicting nature in two dimensions greatly. My mind is better able to process how form turns and how light falls on those forms far better than if I hadn't.

Greyhound-3


Greyhound-5


Greyhound - tail anatomy


Greyhound - Scurve2

My underlying interest in visual language is the idea of making something, anything feel alive to the viewer, whether it is realistic or fantasy; I want to be able create an illusion and spirit of life, the sublime. I strive to transcend technique in order to create something beautiful that reflects Nature in a visually poetic manner. It is this idea that keeps me pushing forward, wanting to learn more, improve my abilities and become increasingly skilled at how I might do this. Sculpture has helped me understand in a different way how to think about how to capturing "aliveness" of a creation. While I am certainly a lesser sculptor than others, I feel exploring this medium has helped me solidify ideas about visual illusions.

At this point, I decided to place a black board behind Bowie so that I could see more clearly the lines of her form. I started to soften the muscles and add some areas of compression along with skin folds. I came to the conclusion that although some of the sculpture might not be entirely "correct", it was my choice in serving the design at this point; I enjoyed rounding out forms and accenting areas I found the most beautiful.

Lundman-1

Lundman-2

*********
My "finished" sculpture, at least as finished as I want it to be:

"Bowie", oil based clay on wood base.

Lundman_Bowie_frontview1

Lundman_Bowie_frontview2

Lundman_Bowie_side2

Lundman_Bowie_back1

Lundman_Bowie_back3

Lundman_Bowie_side3

Lundman_Bowie_topview1

Lundman_Bowie_topview2

s curves in motion:


While I worked on this sculpture throughout the summer, I took breaks to attend the Weekend with the Masters painting conference, which you can find in some of my previous posts, but, perhaps more interestingly, during this time I immersed myself in the work of string theorist Brian Greene, author of "The Hidden Reality". *

Aside from ideas about the shape of our questionably infinite universe, one fact about Greene's work stands out as entirely relevant to every day considerations: 

"Nothing in the laws of physics points to free will. Therefore, like time, it is a useful illusion. We are a bag of particles governed by the laws of physics.  And that’s it.”
 (from an interview with screen writer Charlie Kaufman)

 Really? Assuming Nature created these complex particles, it also created the desire for some of us to want to recreate it in art. Why? To understand it? For what purpose? Maybe meditating on Nature's beauty is somehow important in the grander scheme. It certainly is for me at least.

*You can also watch a fantastic PBS dvd series based on his book by the same name, "The Elegant Universe", which explains quantum mechanics in layman terms and is pretty enjoyable regardless (among numerous articles and speeches published all over the web).


The Seasons, "Spring" - Work in Progress, Butterflies and Bees Sketches

I made some progress on my "Spring" painting this past weekend by studying butterflies and bees. I have not previously studied either insect up close had some questions about how wings look in various positions.

  After studying some photos, I found three axises regarding perspective of the wings.

Lundman_butterflystudies002
and here is a better illustration of the perspective lines:

Lundman_wingperspective

I noticed that sometimes one of the blue lines moves closer to the main axis while the other stays farther away, usually the wing that is closest to us. Using this trick helps to draw wings in perspective, although I have not tried it in every wing position.

Lundman_butterflystudies005

Lundman_butterflystudies001

I also did some bee studies.

Lundman-Bees001

Lundman-Bees003

I will incorporate some of my favorite sketches of the butterflies and bees into my final pencil rendering for "Spring". But in order to finish the pencil rendering, I need to work on the main figure, which is what I will work on next. After I have finished some studies and finalize the figure, I will compose all of the elements in photoshop, print that out, and draw one final drawing, which will be the blue print for my painting.

It might seem like a lot of work before making my final painting - and it definitely is. Experience has taught me that the effort is worth it in the end. I enjoy the process of learning and discovering while working on a painting; the things I learn always stay with me.

Please stay tuned for more progress on my painting, "Spring". :))
In between posts about "Spring", I will also be posting about the workshop with Bill Cone I'm attending, and also my long promised post on some notes I've taken regarding Structure.

Thank you for visiting!

************************************************

Here is a documentary about bees that looks fantastic. "Queen of the Sun, What are the Bees Telling Us?"   In theaters now.


"Fall" work in progress, Part 4


This painting is taking forever. I only have nights and weekends to work on this, so progress is very, very slooooowwww...... so many little details yet to paint, two weeks left to go before I need to scan and make prints for APE.

The birds are cedar waxings, which have a field day in the fall pulling berries off of branches. My next step is to finish all the birds, add blowing leaves, branches and berries, and finish up the background, which I would like to be simply stated and soft. My process is pretty straight forward: block in the big shapes in a thinner mix of oil paint, breaking down light areas and dark areas first. After the basic shapes of light and dark were applied, I built up thicker areas on top, with more value transitions in between. For thicker areas of paint, I use less thinner and more medium, which is 5 parts rectified turpentine, 1 part linseed oil, and 1 part dammar varnish. I like this medium because it allows the oil paint to get a really nice sheen to it as it dries, which is the look I'm going for in this one.
I realize the entire painting looks very orange. It is intentional. Since this is a series of four paintings, each painting will have a dominant color. I felt the Fall painting would be predominantly oranges, yellows, burnt siennas and reds. The birds are a bit more gray, so once they are put in I will add some more gray tones to balance out the color throughout the painting.

"Fall" Work In Progess, part 2

I decided after transferring the drawing to a large board that I needed some more elements like birds and blowing leaves. So on a separate piece of tracing paper I drew out some leaves and birds, then transferred them to the drawing using Saral Wax Free transfer paper.
Btw, I highly recommend Saral brand Wax Free transfer paper. I've been using it for years - I discovered it back when I painted background environments for Lucky Charms and Trix cereal commercials. I needed a way to transfer the layout drawings very accurately on to a board before I began painting. I initially used regular transfer paper but quickly learned that the waxy surface of the transferred lines resist paint.

After I finished the transfer and was happy with the drawing, I moved on to a value sketch and a color sketch. The light pattern in this painting is important in portraying a sense of mood and time of year in this series, so I felt it necessary to fully work out a value sketch before jumping into the final. The planes here are simple: Foreground, Midground, and Background (sky), which are painted in three separate layers on top of my line drawing in Photoshop.After I spent some time experimenting with shadow patterns and values, I messed around with a color scheme, which I painted in new layers on top of the value sketch. I decided on mixtures of three hues: yellow, orange and lavender. I also kept the color very saturated in the foreground to reflect a certain emotional tone I am aiming for in this series.
This is a rough color sketch, so i omitted any details, wanting to concentrate only on the color scheme and figuring out my palette. To go any further would not serve me well because I would burn out on the idea and not feel as excited about finishing the final.

Next, I'll begin on the final painting. I will post the next steps as soon as I can!

"Fall" work in progress

I am working on a series of four paintings, emblems of the Seasons, as I envision them. I sketched out all four earlier this year and finally have the time to resume completing the series. These paintings are entirely from imagination, a skill I have always admired in others, and lately have explored more fully myself (and not for portfolio pieces aimed at gaining a job). I really enjoy aspects of designing a picture that I cannot get from posing a model and painting him or her from life. In addition to that, I have this desire to attempt to make beautiful pictures that are pretty, simple, sometimes fantasy, playful in proportion and design, interpretive, and entirely my own.

In addition to this series, I am also working on a series of Elements paintings. I also have planned two small self published books, which I've designed but need to illustrate. I have no idea how long it will take, given that I have a full time job - but I'll just work, work, work until they are done.

Here is the beginning of "Fall": I coated a piece of cold press illustration board with three thin coats of acrylic gesso, let dry, and am now in the process of transferring the drawing (enlarged from my sketch) on to the board via Saral wax free transfer paper. Since the sketch is so small, I am also drawing out details on top of the transfer, making my drawing exactly as I want it. I've added an expression to the drawing as well, which was not present in the original sketch. Next step will be a small color sketch before painting the larger piece seen here. Stay tuned! (may take about a week)


Technique Experiment

Today I have been experimenting with painting technique tests for the finish on the Sephilina pin up for Jamie's book.

I want to use the watercolor techniques I've often used in the past, but also preserve the line work. After several unsatisfying experiments, I decided to use gouache with smoothly modeled soft finish rather than a loose watercolor style.

The first thing I did here was draw out a little sample with tuscan red pencil, fleshing out the shadow pattern (which I took liberties with) and added some lines. Next, I applied Golden Acrylic Fluid Matte Medium in a thin layer.


After that, I painted in the local color of the face and hair, very thinly, in gouache, and then began building up layers in the shadows, preserving the white of the illustration board as much as possible. I did find I needed to glaze a little white gouache over some areas and used it for a soft highlight here and there.
After all of that, I used my all time favorite pencil, a brown Stabilo Aquarelle pencil, to add a few lines on top of the color.