BACCA workshop with Michael Klein

"Every worthwhile art movement supports and encourages it's members to become better at what they do." - quote from Michael Klein.

This summer I have been very busy taking a Maya modeling class while I am also working on a personal project. Although most of the work I've been doing involves staring into my computer screen for most of the day, when I heard artist Michael Klein would be teaching a floral still life workshop at the Bay Area Classical Artist Atelier, otherwise known as BACCA, I jumped at the chance. 

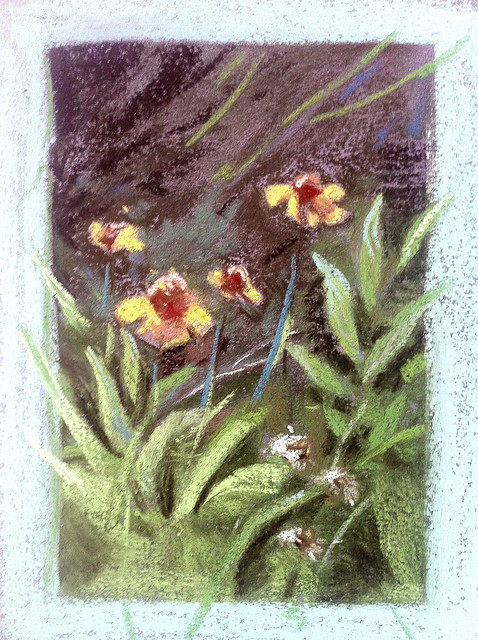
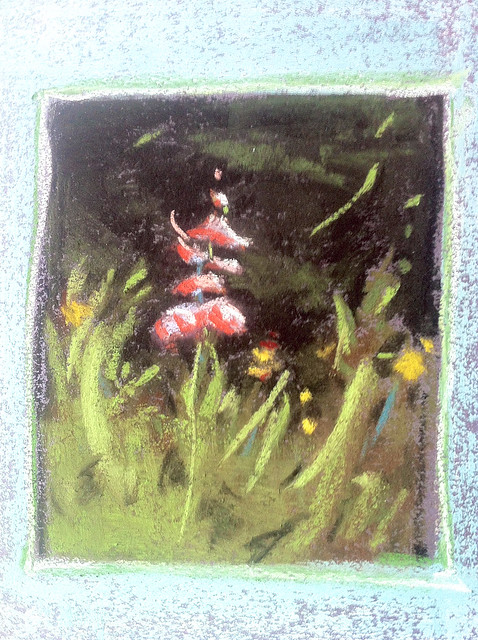
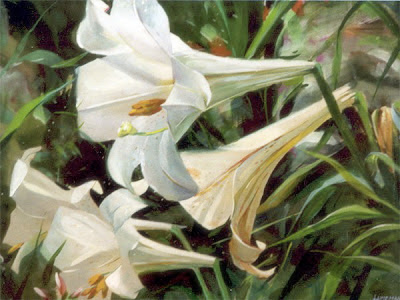
Here are just a few examples of Michael Klein's work, focusing on his florals. His work encompasses figures, still lives, and semi-narrative pieces, all done in a painting manner that brings the spirit of the subject to life with energetic, yet carefully planned brushwork. Much more of Klein's work can be seen on his website:

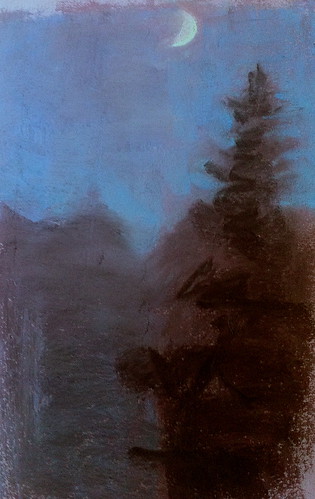
I love the textures and depth that he paints in his floral arrangements. They remind me a little of Fantin Latour florals while still being all his own.

 Michael Klein's progress shot from his blog on his website. GORGEOUS!

********************************************************************
BACCA

The Bay Area Classic Artists Atelier is a wonderful traditional 19th century atelier right in the midst of an industrial park very near to Silicon Valley in San Carlos, California. The studio itself, run by tireless founder Linda Dulaney and a few dedicated studio hands, was comfortable to work in, providing taborets to store our supplies during the week, daily snacks, coffee, and relevant reading material on hand.

The atelier has a wide array of on-going workshops, courses and a once a week open studio with a model. During Michael Klein's floral painting workshop, next door in the adjoining studio, Dan Thompson was conducting a gross anatomy course with afternoon visits to Stanford's lab to study from a real specimen. I loved that there was a lot of great art on the walls that was not only Linda's, but also artists who have taught there, including great anatomy breakdowns on big sheets of butcher paper. Inspiring!

********************************************************************
WORKSHOP NOTES

Materials 

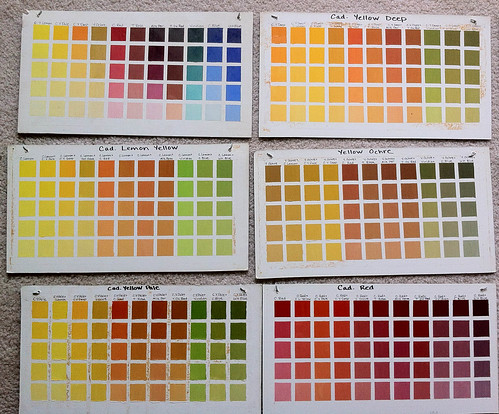
Michael Klein provided us with an interesting palette of colors and arrangement I have not seen before now with lead white or titanium white in between his yellow and orange hues. Interestingly, he begins his arrangement with Viridian. Omitting Cadmium Red, he instead included Cadmium Orange. He also includes Ivory Black on his palette. Just past Ivory Black, low saturated colors sit towards the end of the palette arrangement with Raw and Burnt Umber. Colors are as follows in this arrangement:

Old Holland Viridian Green Deep
Michael Harding Raw Sienna
W and N Yellow Ochre Pale
W and N Cadmium Yellow Pale
Rublev Lead White no. 2
OH Cad. Orange
W and N Burnt Sienna
W and N Perm. Alizarin Crimson
OH Quincinadrone Magenta
W and N Cobalt Violet
W and N Cobalt Blue
OH Ultramarine Blue
OH Ivory Black
OH Raw Umber
OH Burnt Umber

Mediums used were simply Gamsol for cleaning brushes, which he uses mostly on the first day to thin down the paint a little if it's too thick or sticky. After day one, he uses a widely known mixture known as "fat medium", equal parts linseed oil plus damar varnish. In later stages of his paintings, he makes use of Rublev Oleogel to thicken up paint strokes and add texture. Paint rags were Viva paper towels.


I did not have Oleogel for the class, so Michael gave me a tiny smidgen to test out. The gel is used for glazing, but also for adding body and flow to the oil paint on top layers. It is truly amazing stuff. I ordered a big vat of it along with the lead white. Michael noted that with Lead White he will sometimes mix it with a few drops of walnut oil to loosen up the stiff mixture. (He also uses stack white from Rublev to create texture, although he wasn't using it in this workshop.)

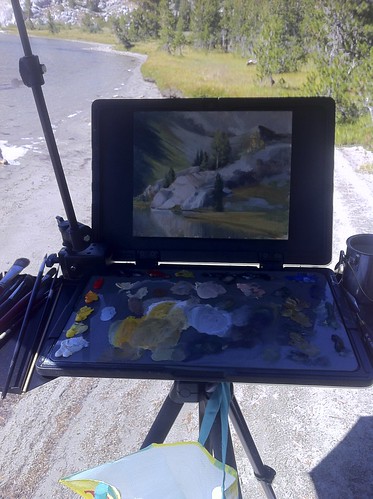
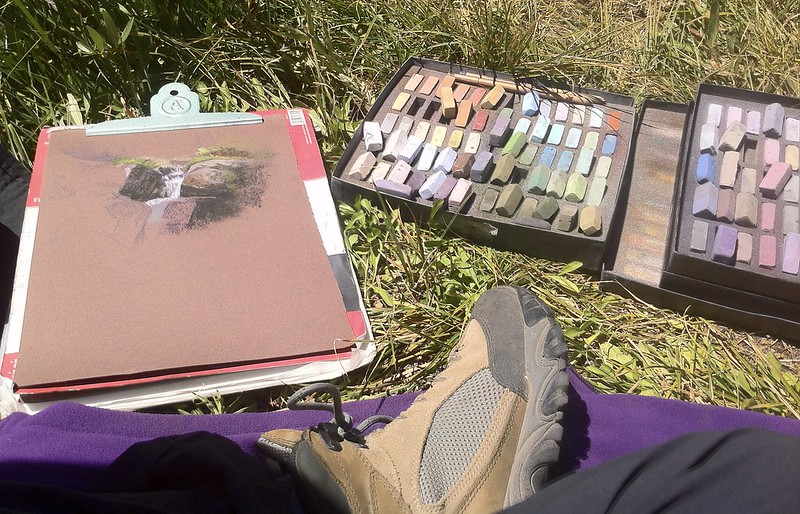
Surface and Easel: Like many painters lately, Michael Klein paints on dibond, an inexpensive but very durable metal composite that is easy to order. It comes in one big sheet that arrives with a light primer on top, which he sands and then cuts into smaller pieces, after which he applies either gesso or lead gesso on top. Dibond sheets are easy to cut with a box cutter, which you can use to make scores and then break off into smaller sizes. Also, since the sheets are magnetic, they work really well with the magnetized holding mechanism of the Edge Pro pochade box, which he was using with a tripod. (I have one as well - it's very durable and sleek, although I can't recommend it for carrying around on long hikes because of the weight.)

Brushes: In our workshop, Michael Klein mostly used synthetic rounds. Rosemary and Company will be soon making a custom set of Michael Klein brushes which come with short handles and a pink rosey color he designed specifically for floral painting. I will definitely order a set!


Michael's custom brush set right under that tube of paint. 


*****************************************************************
Process

Each of the four days of Michael Klein's workshop, he worked on a painting demo. He typically spends about 3-4 days working on a floral still life.

Mixed in with his natural flowers were two artificial flowers, which he doesn't like to use but did for this class. He noted that when flower companies make good quality artificial flowers, they mimic natural color patterns of the flower, like spray painting the joints of the stems and leaves with a little brownish overlay instead of one uniform green and will also boost saturation of petals. When using artificial flowers, you will need to understand the methods that manufacturers use to make their flowers appear real and compensate by using your observation and knowledge of real flowers. However, use real flowers whenever possible.


Michael's demo from the first day, pictured above. He explained that when it comes to floral paintings he usually spends the first day blocking in the first half, the second day the second half, third and fourth day for finishing and adjusting. Although he used to spend a lot of time making a detailed line drawing, which he then transferred to canvas, he no longer uses that method. These days he instead dives in with a block in of basic shapes, starting with the background area as a foil against the larger shapes and green leaves that typically sit underneath the main forms of the flowers. He sometimes uses a very soft fan brush to lightly brush over the background to knock down some edges and to avoid glare on the surface. He also noted that he tends to work from the center out, working on each shape one at a time.


My initial block in, above. Michael thought my background color was too far into the brown/warm tones so I worked on adjusting that the next day. I had been thinking I would warm up the cool ivory black background to be more warm, but he felt I should stick to the truth of what was in front of me because of the reflected light that worked into the flowers, especially the yellows. 

On the second day, after watching more progress on Michael's demo, I made color adjustments to the background, after which I spent a lot of my time making drawing adjustments in order to get the shape relationships to balance a bit better. Unfortunately, it was then that I noticed I placed everything too far to the left of the canvas. Michael told me I could emphasize the atmosphere in the background to compensate. Using light as an element of composition is always a plus, in my book. 

End of the second day I got most of the big areas in, adjusting drawing, color and value.

When I came in the on our third day, I was disappointed to find that almost the entire black background had sunk in, making the paint appear a dull lifeless black! Ugh! That might be ok in some situations, but in this case it really dulled out the color and made the flowers themselves look terrible. Michael explained to our class that sinking in happens when you paint over a dried layer of paint with no medium, which is why using some medium in subsequent layers is necessary. Sinking in can be fixed by either repainting or using spray touch varnish, which I couldn't use in this case because I would be painting all day and couldn't wait for the areas to dry. After some touching up and repainting, I realized I had lost the gesture and luminosity of the initial block in, which is so key to making florals feel fresh. A serious downer, but I pressed on. (incidentally, if I were at home working on this, it would be at this point I'd quit and start over)

You can see the sunken in areas especially in the black passages. The color here was completely painted over in order to correct the hues, but instead of remaining luminous, it flatted out and sunk into the canvas, creating a dullness. Yuk yuk yuk!!!

As for overpainting on a dry surface that already has oil paint, Michael explained that if you cut into paint with more turp (gamsol), the painting will crack, which is one reason, along with sinking in, that using a medium is necessary at this point. (In fact I have seen this happen in some of my own older floral paintings, a few of which I will not sell because of the cracking.) He likes to use linseed oil mixed with equal parts of damar varnish (a similar mixture "fat medium" that I've used in other classes). This along with Oleogel should be sufficient. It is OK to continue to clean brushes with gamsol, just as long as you don't cut the gamsol into your paint mixtures to thin down paint. (Don't panic if a few drops inevitably get in there, though!) A hard lesson to learn, but I will probably never forget...


After fixing what I could in the background, adding some light coming from the upper right, I pressed on, mainly working on the color relationships between the yellow flowers, and the white ones to the right. 

Michael had an interesting side demo (below) on the paint effects that can be had by layering pigments. For instance, the neutral warm background color, when brushed or scrubbed into the surface, appears warm. When that very same color is lightly scumbled over the same, but thinner color, it appears to be cooler. How awesome is that? Also, he layered on thicker colors like a basic warm burnt sienna/ultramarine blue mixture that serves well for green shadows and then worked up to a floral orange hue to show the depth that can be created with these particular mixtures. 


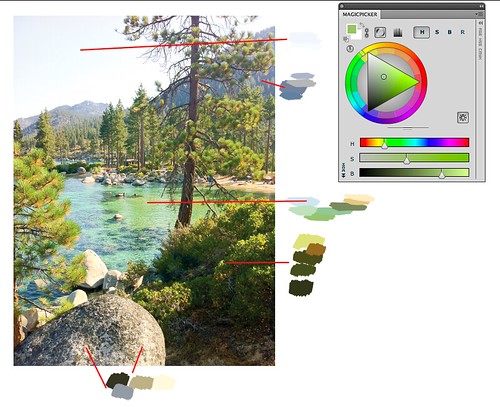
As for color mixing in general, he explained that he doesn't like to overmix his colors on the palette, but instead "loosely" mixes, keeping a bit of each original color separate, so that when the colors move on to the brush and then the painting, a light effect mixes them in our eyes, producing a color vibration. This is a technique I've seen before and used myself, especially with pastel paintings, and also have read about. Golden aged Illustrator Haddon Sundblom's painting method included using two pure colors on one brush to create a mixture directly on the canvas. I'm not sure if this method is an innovation by the Impressionists, but the idea of vibrating color via broken color and paint layers feels impressionist to me. 

Also, regarding color mixing on the palette, Michael encouraged everyone to create a "puddle of color" that is essentially a color portrait of the thing you are painting, otherwise you will end up with a lot of muddled color. My own tendency to dance around the palette with all sorts of mixtures usually leads to confusion at times, which I need to work on correcting. He does not create "strings" of color on the palette, instead he creates the middle hue, shadow and light hues all in one puddle.


During his demo, he spoke a bit about using a combo of observation vs. knowledge of form. He explained that Jacob Collins emphasized a thorough understanding of form and how light moves across it, and it was when he finally understood what that meant, that he finally made some breakthroughs in his work. He went on to explain that after painting the initial gesture on the first day, he will start thinking about what he knows about how light reacts on the surface of particular forms. Often, he will not look at the still life but instead focus on the object being painted, paying attention to the direction of the light source and modeling the form so that it reads clearly while still maintaining the beauty of the still life. 


This becomes particularly necessary when painting subjects like flowers, which change each day. When asked about his atelier training compared to how he paints now, he explained that in his current work, he is now concerned with evoking a mood or a feeling rather than rendering every bit of the subject in front of him, trying to find that balance between the truthful statement vs. gesture. 

For form painting demos, Michael recommended the excellent form painting lessons by fellow Grand Central graduate, Scott Waddell. I've seen all of Scott's videos and they are indeed incredibly useful.

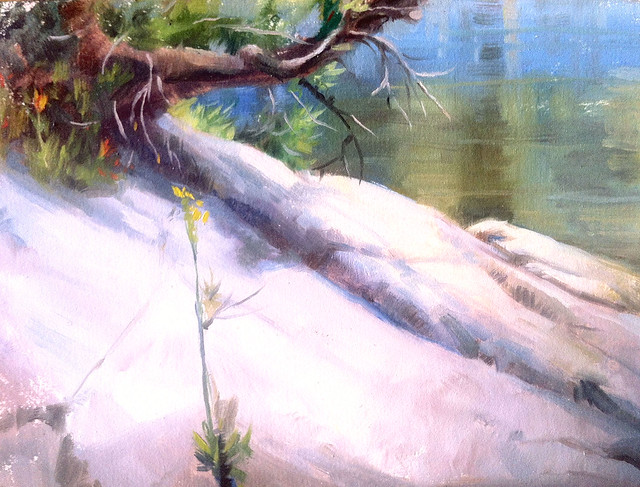
My final painting, which I've cropped to make a more attractive composition.

On the fourth and final day, Michael helped me at the end make some value relationship adjustments and talked with me about editing to the highlight, which did not serve the overall painting as it was too eye catching and distracted from the main subject. His emphasis throughout the workshop was always on the final, poetic statement rather than a 1:1 rendering of the subject, which I agree with wholeheartedly.

Michael Klein's finished four day demo.

During his demo on the fourth day, he spent some time working again on the main white rose, making shifts to it because it had opened more fully than it was a few days earlier. Rather than repainting it entirely or making too many drawing adjustments, he simply added to it, explaining that he liked that the new additions added more variety to the painting.

*****************************************************************

Is it Alla Prima?

I think over the years that the term Alla Prima has become overused and misunderstood. Alla Prima is strictly a one session painting. That session might last a full 12 hour day, sure, but it is always one session, wet into wet. This came up because I think, generally speaking, people tend to assume that any painting that has a looseness to it is an Alla Prima statement. I asked Michael if his paintings are not AP, what are they? His answer was simple, they are just paintings! 

On a personal note, when I was first introduced to oil painting as an 18 year old art student at the American Academy of Art in Chicago and then at the Palette and Chisel where Richard Schmid and many other amazing artists were painting, I fell in love with what the medium could achieve and the promise of what I might be able to as well. I had never seen paint become so intriguing; sketchy, energetic brushwork that came together in harmony to represent everyday things like portraits and figures, still life, and animals with rich color and layers of texture. That is where I first heard the term Alla Prima, the painting approach that Richard Schmid popularized throughout the 80's and 90's and especially with the release of his book, Alla Prima. 


1993, I think. I believe this was a four hour demo. I mainly remember being so stunned at how quickly he was able get down rich color juxtaposed against greys in the white objects - and especially how loose and sketchy it all was. 


Of all those years, this unfortunately blurry photo along with the one above are all I took of the actual man. The majority of my photos taken were of actual works hanging on the walls in revolving shows, auctions or works in progress. I'm still kicking myself for taking these blurry photos! 

As much as I love a good Alla Prima sketch, my question has always been the same, how can I maintain the look of an Alla Prima sketch but work on it for multiple days without losing that fresh brushwork? Often, when I worked on a painting more than one day, many of the problems I encountered in this workshop were similar - sinking in, dry cracking paint, or thick paint that just looked dull and lifeless, overworked, over rendered, boring. I've always admired painters that are able to maintain a fresh feel in their longer pieces, giving the impression that the work was painted quickly and effortlessly. It was a pleasure to finally meet Michael Klein and get to chat with him about various ways to strategize and plan a painting to create a mood, a visual poetry, throughout a longer, more elaborate work. What a great experience, one that I will keep close throughout my new paintings.

Note: My next several updates will be a switch back to digital work for a personal project I am working on. Entirely different, and yet so many of the core concepts overlap one another. 

Thanks for reading!

A Couple of Plein Air Digital Paintings

For awhile now, I've been trying to come up with an easier take-with-me-everywhere method of plein air sketching. I have full plein air kits for pastels, oil and watercolor, but often I find that even though I keep one of these kits in the trunk of my car, I usually don't feel inclined to bring it all in to a restaurant, coffee shop or on an afternoon trip downtown. I wanted something MUCH more lightweight and accessible - and the iPad has been it.

Here is a sketch from a recent day trip to the ferry building in San Francisco, a busy tourist-heavy area of the city. 

A lovely day plein air painting at the San Francisco Ferry Building. I used the iPad Air, Procreate app, and Wacom Stylus 1. Music by Karrin Allyson, "From Paris to Rio". A note about the stylus: I recently purchase the Wacom Stylus 2 and discovered it does not work with many apps, including Procreate.

My main objective with iPad sketching is to mimic plein air oil paint using the alla prima technique, direct painting, as opposed to more labor intense methods. The idea is to work quickly on site and get it all down in about an hour or so of working. That means everything from gesture, composition, hue, value relationships and light relationships.

About the hardware: I have yet to find a stylus I am completely comfortable with; I am currently using the Wacom Creative Stylus. I am not keen on recommending it, however, because it feels like painting with a giant crayon. I unfortunately purchased the Wacom Creative Stylus 2 and found afterwards that it is not compatible with many painting apps, including Procreate. A few friends have given good reviews of the Jot Adonit Stylus, which is far cheaper and compatible with a lot of apps. 

In the Procreate app, I created a set of swatches in the color picker that are the standard colors of my basic oil painting palette, plus a few white convenience colors so that I don't have to constantly mix the same color over and over. Using these swatches helped me in getting a similar look to traditional paintings, although I think I could still fine tune the set. 

In addition to that, I am still trying to refine my brushes to find a working method that mimics traditional brushes. Procreate provides a set of brushes that you can then customize, but  I have yet to find some that are to my liking.

Continuing my exploration of digital iPad paintings with the Procreate app, I've tried to mimic my oil painting palette in the color picker to see if I can narrow down my palette choices. I am trying to find a good working flow for alla prima digital studies that actually look like oil painting sketches.

New Studio Painting In Progress

A few years back, I started taking classes at the fantastic crafting store in Berkley, Castle in the Air, where I met the most wonderful artist, Ulla Milbrath. Up until then I had mostly been working as an illustrator in games in the bay area, and was feeling quite isolated in my home office. After I was divorced in 2007, I told myself enough was enough; I decided to step out into the world again and start making connections back to the things that I truly love - not for the sake of my career or becoming anyone important in the arts, but for myself, my soul, and my own love of crafting fine things that bring me joy. 

When I was growing up my mother was always making something or other. One of my earliest memories is of my mom crocheting snowflake ornaments for our Christmas tree. If she wasn't making new ornaments for our tree, she was sewing my and my sister's wardrobes, making dolls and doll clothes for us, making all sorts of decorations and whimsical creations for the many houses we moved into as a nomadic military family. Almost every toy and piece of clothing that I wore growing up was made by my mom. 

So I started taking crafting classes and eventually stumbled into Ulla Milbrath's classes where I learned to make paper flowers. Ulla is one of the most wonderful and inspiring artists I know! She is incredibly inventive and creative, and stitches the most lovely things you can possibly imagine. She even paints on porcelain! You must check out her blog and be sure especially to follow her Pinterest account where she posts the most amazing reference material. 


Some of the flowers I made in her classes. I've since become quite obsessed with paper flower making. They are also a fantastic way to study botanical subjects.


Paper flower making was a popular past time in the 17th and 18th centuries in Europe. Botany at the time was all the rage as people became interested in plants from around the world and learned about classification of various species.  


Having lots of flowers around the house I had been wondering if it might be possible to compose them in a still life. I was thinking however that I wouldn't want them to be merely props for real flowers, but intentionally composed so that it is understood that they are crafted flowers. I played around a lot with this set up. I even included lots of other things at one point like scissors and glue, but took them out in the end because I preferred the look to be a little more subtle, kind of like a diorama.


The above monochrome is the open grisaille, the first pass underpainting. Below is the start of the closed grisaille, which ended up a terrible disaster...


I started this grisaille with a new tube of Michael Harding Titanium White no. 1. While I was painting I noticed the quality of the paint seemed thin and somewhat odd. I got as far as I could in one day. When I came back one full week later I found that 100% of all of the white areas of the painting were still very wet AND several of the half tones in the gradients were far darker and patchy than I painted them. On close inspection, I narrowed down that it was the white paint I'd purchased which was ground in safflower oil as opposed to linseed oil. When the manufacturer was contacted, he assured me there was nothing faulty in the paint and that it must be something wrong with my process… 

I decided to make the tough decision to wipe off all of the white paint that I could, feeling that it was obviously unstable paint. I did not want to risk this paint pulling up subsequent layers in the future layers.


I wiped off all the paint and found strange patchy areas underneath. 


So then I decided to sand to make sure there was no white paint left and a more even surface.


I waited a little more than a week, came back and found my painting was dry enough to repaint the grisaille again, this time using my old classic Vasari titanium white (along with burnt umber and a tiny bit of ult blue). 

The next stage will be COLOR. For this little painting I'm going to do a one day alla prima color study so that I can work out the subtle whites and reflected light in the composition. After that I will move forward with the final.


This year has been my 20th year of working as a professional artist. I am in the midst of completely redesigning my website, updating it with new art from this entire past year and a half at my job as Art Director at Disney Interactive. I have a lot of new work to share and will do so as soon as I can! I also have quite a few more tree studies to share soon.

Thanks for visiting! 

Found in the Minarets, Sierra Pack Trip

Earlier this month, I went on a fantastic six day painting adventure with artist friends

Bill Cone,

Paul Kratter,

Ernesto Nemesio,

Michele DeBraganca,

Jeff Horn,

Eric Merrell and

Sergio Lopez

to the Eastern Sierras - John Muir-Edgar Payne country. It was precisely the kind of uninterrupted painting time I so yearn for but don't very often get. 

Lake Ediza was our destination, a steep hike up from about 7,000 feet to around 10,000 at the lake. As we hiked up from the Agnew Meadows pack station where we dropped off our gear for the mules to carry up, I was floored by the incredible views along the rocky trail as I breathlessly made my way up slower than my group, despite the conditioning/training I did a few months before the trip.

Lundman_muletrain

Our mule train arriving after a long hike up to Lake Ediza. Eric Merrell on the far right on top of a boulder.

Lundman_tentatEdizacamp

I set up my tent just under a tree, situated rather close to our cook's food storage/prep area due to the view of the Minarets from my tent. Given that we had a 4:00 am bear visit to the camp site, I think in the future I'd place my tent much farther away from the food source. I'm sure the view was just as magnificent a little further away.

Lundman_Minaretsviewtent

Zipping down the front flap to my tent each morning gave me the most amazing view! I did a few little pencil sketches from my tent in the mornings but mostly sipped coffee while staring at the mountains and feeling like all was right with the world. Probably not the most efficient use of my painting time, but deeply enjoyable nonetheless.

Before I went on the trip I planned out how I would approach the week of painting. I intended to sketch out a couple of long shots, a few medium and a couple of close up intimate scenes so that I could create a portrait of the area from large scale to the very small.

What I hadn't counted on though was how much the altitude seemed to factor into my experience within the first 24-48 hours. After we got up to Lake Ediza from a long and difficult climb up to almost 10,000 feet elevation, I found that even after a long rest and some water that my heart was beating quite fast. I tried my best to ignore it, but my worry distracted me and I didn't paint very well the first day.

Lundman_oilsketchnewkit

After the first 24 or so hours, my heart slowed to it's usual pace and I felt pretty comfortable. Still, I decided to stay close to camp to further acclimate to the elevation. While my camp mates were hiking up steep terrain in pursuit of painting gargantuan landscapes, I crawled along a stream bed close by looking for miniature wildflower compositions.

Lundman_wildflowerstudy1

I attempted several minute scenes, but these two are my favorites of the lot. Most of these tiny compositions were along stream banks underneath tree growth bathed in beautiful cool sunlight with reflected light bouncing in and deep warm shadows. The pastel set I brought did not have a yellow that was as bright and pure as the yellow I saw in the light, so I tried my best to layer a few colors together and tried adding some transition color along the edges in order to brighten the color.

Lundman_wildflowerstudy2

I also had some fun playing with the outside edges of the compositions, layering blue and accenting the edges with an emerald green. These little compositions reminded me a lot of the kind of watercolor paintings I did a lot of in my 20's. I would really like to get some hot press watercolor paper and do some more of these little flower studies. 

In keeping my goals, I decided to venture further away from camp in order to attempt a long shot landscape. I found a bank of trees at the opposite end of Ediza near to where we hiked in and made myself comfortable by the lake shore in a shady spot. I always enjoy large view paintings but do find them daunting at times. Part of the reason for this is probably technical on my part; I feel the need to hang out in one area until I get the entire area correct in terms of value, hue, and saturation before moving on to anything else. This I am sure is due in part to the lessons I learned early on at the Palette and Chisel via Richard Schmid, who often lectured about the importance of getting everything correct within the focal point first. It is entirely possible that I misunderstood his point, but still, there it is, imprinted on my art mind forever and the way I've approached painting since I was 19.

Bill must have wondered what the heck was going on because at one point he came up to me and said, "Commit Julia! Commit!" I had to laugh because I knew exactly what he meant. From that point on I told myself over and over, "stop the bullshit and lay in some more color!!!" I did find it helpful to stop lingering as much as I was in my focal point and get some more color down.

Lundman_sketch1
Lundman_treegroupingLakeEdiza

What attracted to me to this grouping of trees was the deep shadow within the bank of trees at the bottom. I liked the way the shape looked and liked how it was juxtaposed against warm and cool greens in the light. I'm not sure this photograph picked up the variety of color in the shadow very well, unfortunately.

Also, while I painted the mountain in the far distance behind the bank of evergreens, I noticed that the colors were muted variations of reds and greens, a color scheme I saw near the foothills of Zion National Park in Southern Utah. I wondered if these mountains have some of the same elements.

Switching to oil, I wanted to make a few studies of the light on rocks down by the water. I was attracted to the color in the shadows on the rocks - just jam packed with rich color that made it really fun to paint.

Lundman_rockfaceontheshoreofEdiza

However, this simple study was more challenging than it might look. I'd look down to mix up some color, look up, and all of the sudden the temperature in the light was completely different! I decided it was probably due in part to the reflection of the shimmering light coming off of the water from Lake Ediza. This one is also on Arches oil paper. I layered the paint thicker in this study to compensate for the absorbency of the paper which seemed to make my values at least a full value darker about ten minutes after I laid down the paint. 

I did another few studies of the Minarets but became frustrated with the oil paper.

 I think I'll switch back to my usual L219 new traditions panels for oil studies. 

Lundman_rockfaceEdiza

Switching back to pastels, I decided to turn around, move down the beach and paint a close up study of this rock face and shadow. The rock had a blue-grey local color and in the shadow side had some oxidization that made rich brown patterns along the cracks. The entire time I was painting the main deep shadow of the rock I could barely wait to paint in those wisps of grass in the light. When I finally put those little lights in, it was like going to the circus! 

Lundman_LakeEdizaview

I tried a longer view from across the lake. I had to work very quickly on this one since the shadow and reflected light was changing by the minute, it seemed. The triangle of shadow at the bottom was filled with cool deep greens while the shadows above had warm light bouncing into cool shadows.

The amazing thing about the Sierras, at least the Minarets and Lake Ediza, is the reflected light. I found it quite difficult to paint such bright bounce light in the shadows, always thinking to myself that no one would  believe my painting if I painted what I saw in front of me. It was challenging to keep the reflected light within a value range that was in keeping within the shadow while also trying to define form. I've always found rocks and boulders challenging more so than other subjects for this reason.

Lundman_RockSlab

I am so fortunate to have spent time amongst the Minarets with this band of talented mountain loving artists. What made it so deeply enjoyable was the kinship with fellow artists who were all equally enthusiastic about painting. As we sat around the dinner table while Kelly cooked we all talked about what we painted that day, the places we explored and the light we saw.

Lundman_Edizaatdusk

 The light at dusk was just stunning, absolutely my favorite lighting of all, the time of day when all of the color is blanketed in a blue grey bath. Apparently I wasn't the only one interested in this; right after dinner each night, Eric Merrell would begin to set up his pochade box for some nocturne sketching. He had an excellent night time set up with little led lights on his palette that were perfect for illumination and did not blow out the light when you looked up at the dark scene in the distance.

Lundman_EricMerrellnocturne

Eric painting around 9:00. Although you can't see it in this photo, the moon was quite bright, illuminating the landscape and flooding it with warm and cool grey light.

I attempted a nocturne, but quickly learned that in order to do it well I needed a much better lighting set up. Every time I looked down at my palette with my headlamp to locate a color I wanted, I would look up and find my eyes completely unadjusted to the light making everything in sight a giant silhouette. I tried using a dim book light on my palette instead which was an improvement, but then had problems locating the colors I wanted to use. Below is my result, for better or worse. 

However, I did indeed learn A LOT by making the attempt. Not only would I come with tiny LED lights like Eric's, but I'd lay out a limited palette ahead of time full of cool blues, neutral greys, and even warm greys and a few rich violets too. 

The sky was so rich, full of violet and ult blue. I also vividly remember a thin sliver of very warm yellow value 2 light on the outer lighted edge of the moon - very surprising since the rest of the moon looked cooler in the light. 

Lundman_nocturnesketch

Besides developing a nocturnal lighting obsession, I became completely enamored by the lighting around waterfalls that were close to our camp. These areas were typically surrounded by rocks that when wet became a deep brownish color, almost black in some areas. This looked really stunning against the white water washing down around them and the green patches of vegetation nearby.

Lundman_waterfallintoEdiza

I felt like one day's time was not enough to study this waterfall area. I really want to go back and spend a full week exploring the light and color of this incredible dynamic.

Lundman_waterfallsketching

Learning about Color


My first experience in learning anything at all about color was in making color charts at the American Academy of Art. I was pretty bummed at the time and wanted to just move ahead to painting, but looking back now, it was a perfect introduction. In mixing up charts we learned about how paint handles, what happens when one color interacts with another, and how value is related to chroma. After this, we went on to painting monotone samples for a while, then with limited palettes, and finally full color, usually assignments ranging from still life painting, illustration, and figure painting. We always used gouache to paint, with the exception of specialized classes like oil painting or watercolor where we always painted from the model.

However, the real break through for me came from constant practice during my years as a background painter of environments and color scripts at Calabash Animation in Chicago combined with observational painting in my home studio and the Palette and Chisel Art League where Richard Schmid painted.

For my background painting job, there were usually 7-12 imaginary landscapes and interior paintings per commercial that I had to plan out and paint. Because of the fine art curriculum I took in art school, we rarely worked from imagination. My only guess then as to how to make convincing paintings with no reference was to apply the principles I learned about in Carlson's Guide to Landscape Painting, which I kept at my desk and referred to constantly. This forced upon me a need to truly understand the concepts of atmospheric perspective, the way color behaves while in a landscape, and other principles of lighting that cause changes on local color of objects. By working backwards, studying light and atmospheric perspective, I could then put those principles into practice on an imaginary stylized landscape.

 A Lucky Charms commercial pan background I painted in gouache on illustration board, approximately 3 ft. x 14" wide, around 1994

 However, just working from what I learned in Carlson's Guide to Landscape Painting was not enough. I also pored through books of other artists' work, studying paintings very, very closely. If I had no ideas on color schemes for seemingly mundane things like pavement or boring interior walls, I'd look at how Disney background painters were handling these subjects - usually with interesting lighting, chroma and contrast and learned how lighting and color can be an important compositional element in directing the eye. I combed through book stores and the library to find painters who were working from imagination; I practically memorized every inch of James Gurney's Dinotopia book for examples of great color. 

"Lillies", 11x14, gouache on paper, 1992

But working from imagination alone, I believe, is not effective unless an artist works also from life. One tends to inform the other. During my years in Chicago, I regularly painted the still life, figures and portraits from life over at the Palette and Chisel, which helped me to develop a sense of how to mix paint, see color, simplify it, and apply it on canvas. I learned from Richard Schmid the principle of "cool light warm shadows, warm light cool shadows", something entirely new to me at the time. It was there that I learned how critical value relationships are to color, and how important it is to keep your color clean. Interestingly, I also learned from painting the figure and still life how it seems the majority of colors in any given subject seem to be more greyed down that I usually think at first, and how few really true high chroma colors are usually present.

Later on, when I needed to switch to painting in Photoshop at work, the Munsell Color System in the program gave me a way to visualize how connected the relationships are between hue, chroma, and value. 

After having these experiences, I believe that learning about color is not simply the study of one component like a color wheel or color charts. I believe it has to be a combination of methods plus a relentless pursuit in training your mind to see and translate color accurately. I am still learning and sharpening my color and values sense, and hope that by making another concerted push now in my life I might break through a plateau I've been experiencing the past few years. By documenting my experiences and writing down what I know plus reading new research and methods while also painting from life, I hope to make some improvements.

********************************

Learning to Mix Color


Color mixing is one skill in a set of skills that an artist needs to develop for painting in color.

As stated earlier, the first time I ever mixed color was my first year in art school where we mixed color charts. Later, I made much more extensive charts on a recommendation that Richard Schmid made during a lecture at the Palette and Chisel. When he eventually wrote his book, Alla Prima, he included the exact same advice where you can find it to make your own charts. 

The purpose of making color charts is not so that you have "recipes" for mixing color. These charts are not meant to be short cuts, recipes or formulas for color.  At the time I made these I did not know what each oil color did when combined with another in the palette I was using. When I had problems remembering what, for instance, cadmium yellow deep did when combined with terra rosa, looking at these charts helped guide me. When I needed to figure out what color I was looking at in a still life, if I referred to these charts, it helped my eye understand what it was seeing in terms of chroma and value - usually I would mix that color up and go from there by adding a bit of a third. 

Lundman-colorchart-yellowsreds

Lundman-colorchart-redsblues

Going through the process of mixing colors for charts like this is important in learning many useful things about how to handle paint, how to physically mix it, apply it, manipulate it into values, observe what happens to it's temperature, and notice how important it is to keep it clean. Making charts like this is also useful when you add a new color to your base palette or for experimenting with a set of colors to find how it reacts with other colors in your palette. 

********************************

Learning to Identify Color


Sometimes while I was first learning to paint, I used a small piece of white paper with holes punched in it. I would look through this piece of paper when I was stuck, aligning it with the color I was trying to identify. Very often I was surprised at what I found - a color that was either more grey, less saturated, and not at all what I thought it was. Often, I would mix up what I was seeing through the hole and put a small swatch up on the white piece of paper. I would keep doing this until I got the correct color.

To help visualize what I mean, I made up an example from a recent photograph I took. Although the water is somewhat greenish blue, it can be very difficult to identify specifically. Here, by calling out swatches, you can see just how green the water is and what it's value is. Our minds might tell us that the mountains in the distance covered with pine trees must be green, also, however by calling out the swatch, we can see that the hills are not green, but greyed blues.  


Screen shot 2012-08-14 at 3.36.17 PM
Since I was using Photoshop to make this example, I placed the color wheel there too so you can see where the green of the water is placed within that particular hue.

Isolating colors using a white card punched with a hole puncher can help break down the symbols of what our mind "thinks" it sees into what is actually there. Over time, this simple tool helped me to discover just how saturated or non-saturated a color might be. 

********************************

Tools to Understand Color


After sifting through multiple websites, I finally found two excellent sites that explain color and how an artist uses it. Just about everything an artist needs to know about the physical properties of color and light can be found on these two sites.


Other tools that help visualize and explain how color works are demonstrated in chart form.  It is widely agreed within the realist painting community that the Munsell Color System is perhaps the most accurate way of understanding color and identifying it in context with other colors. The system identifies three terms: hue, chroma and value.

value: the black and white scale, brightness, how dark or light a subject is

hue:
the local color of the subject 

chroma: the degree of saturation or greyness of that local color


Another useful visualization of the Munsell Color System is the way that the program Adobe Photoshop represents it. Photoshop has an excellent color picker that brings up a color wheel. However, I prefer to use an enhanced extension called Magic Picker, an excellent color wheel for Photoshop used by many professional digital artists. If you have a copy of Photoshop, open up the program and experiment with painting swatches using the color wheel. Playing around with the sliders and adjusters really helped me see how color works using this system. This is the same chart depicted above, but represented differently.

Screen shot 2012-08-14 at 3.26.40 PM

Adobe published a technical guide regarding the Munsell Color System. You can find it HERE.

For further reading on the color wheel, read James Gurney's "The Color Wheel" series, Parts 1-7 on his blog, Gurneyjourney.blogspot.com. Gurney has a different but related approach culminating from his years of research on the color wheel. Excellent information, worth the read, including the comments.

Artist Graydon Parrish teaches a three week workshop in using the Munsell Color System at the Grand Central Art Academy in New York City each summer. The usefulness of learning the Munsell Color System is that it can help any artist identify any color, and use that color to depict anything he or she wishes. It is complex to understand at first, which requires some study and practice. I hope Graydon continues to teach - his classes are on the top of my list to attend!

Here is how Parrish describes the way he determines color in his paintings:

"What distinguishes my system is that I make strings of single chromas combined with single hues. I analyze what I am going to paint, find its notation, then mix up strings to cover the range. Reilly's method used cadmiums, way out of flesh range. A string of cad orange brought down with burnt umber/alizarin crimson shifts not only in value, but in hue and chroma as well, making it hard to predict. Reilly too recommended the addition of neutral greys to kill the chroma, but this causes the hues to shift as well. This is something Reilly never mentioned.

The above is just the beginning. One can analyze, then translate so many effects of nature into paint. I have a photo of a Bouguereau drawing where he had written the various colors of his model: green-grey, yellow-grey, rose-grey etc. With Munsell, the notations can be much closer. No more vague terms. (How much grey, for example, is in green-grey?) Its better to say 7.5 YR 6/3 or 7.5 R 5/4, for the average flesh and the ruddies. Then with mixing and planning, one can create an entire palette of Bouguereau flesh, for every change in value, and predict the rise and fall of chroma.

Likewise, Paris Hilton, could be studied and painted as well in all of her sun-tanned splendor. She is likely a chroma 5. When you then know where the chroma rises and where it falls, why some colors pull yellow in the lights and others don't, and how various transparent objects are more chromatic on the edges, then you have the beginning of an entire repertoire of visual phenomena from which to create." - quoted from the wetcanvas.com forums, HERE.

********************************

How Color Behaves in it's Environment


In addition to studying the Munsell system, learning how to mix and identify color, it is critical to also understand the principles of light and how color is affected by it. Matching color in any given subject is an important skill in developing the eye to see color correctly and helps to determine your palette and pigment choices. However, also understanding the reasons that make color appear a certain way in a particular situation is equally as important.


The very best books I can recommend are:

 Carlson's Guide to Landscape Painting

 Andrew Loomis, Creative Illustration

James Gurney, Color and Light

Richard Schmid, Alla Prima

Here is a summary of some important points I learned from these books about how light and color work together:
  • cool light produces warm shadows; warm light produces cool shadows. (Alla Prima)
  • the most saturated color in a particular area is at the transition between the light side and the dark shadow and also at edges of objects. (Color and Light)
  • Values in a landscape are often as depicted below, the source of the light, the sky, most often (even at night) being the lightest value in the landscape, the ground plane the second, slanting planes third, and upright planes usually the darkest. (Carlson's Guide to Landscape Painting)
  • Value is the most important factor in a painting, with hue and chroma coming next. If values are correct, hue and chroma will still be able to read. (Color and Light)
  • a color will alter it's appearance depending upon the context of that color in the light or if other colors around it change. (Alla Prima, Color and Light)
  • the limitations of pigments prevent us from depicting the wide range of luminosity in the world around us, so we must make adjustments in order to get across an approximation of what we see. (Alla Prima, Color and Light)


page 34, Carlson's Guide to Landscape Painting by John F. Carlson

In "Creative Illustration" by Andrew Loomis, he dedicates a chapter entirely to the great Howard Pyle. Loomis included this chapter in order to pass on directly, in print, information that was taken in note form during classes taught by Pyle regarding his general theory regarding light and color.

"All objects of nature are made visible to the sight by the light and of the sun shining upon them. The result is that by means of this we see the colors and textures of the various objects of nature.
From this it may be seen that color and texture are the property of light and that they do not enter the property of the shadow. For shadow is darkness and in the darkness there is neither form nor color.
Hence form and color belong distinctly to light. Shadow - as the object illuminated by the sun is more or less opaque, so when the light of the sun in obscured by that object, the shadow which results is more or less black and opaque, being illuminated only by the light reflected into it by surrounding objects.
By virtue of shadow all objects of nature assume form or shape, for if there were no shadow all would be a flat glare of light, color and texture...But when the shadow appears, the object takes form and shape.
If the edges of an object are rounded, then the edges of the shadow become softened; if the edges of an object are sharp, then the shadows is correspondingly acure. So, by means of the softness or sharpness of the solid object, is made manifest. 
Hence, it would follow that the province of shadow is to produce form and shape, and that in itself it possesses no power of conveying an impression of color or texture."
-Howard Pyle, as quoted by Andrew Loomis, Creative Illustration, pg. 136